
Getting Started
This documentation will help you integrate the ConsoliAds Mediation Unity plugin to get instant access to the best ad networks around the globe for optimized mobile ad analytics and earnings.
A nominal size increase of 4 MB is expected when the following ad networks are integrated; Admob, Unity and ConsoliAds.
In case you are updating to v12.x.x from older versions of ConsoliAds, please see section ‘Updating from Older Versions’ and proceed to ‘Ready to Code’ show
Before you proceed to integrate, make sure you have:
- Registered at ConsoliAds (https://portal.consoliads.com)
- Logged in to the ConsoliAds dashboard (https://portal.consoliads.com)
Updating from Older Versions
NOTE: You can skip this step if you are integrating ConsoliAds plugin for the first time
Mandatory steps to follow
Before starting to develop on ConsoliAds Unity Plugin 12.x.x, please make sure to:
- Completely remove already integrated ConsoliAds: use uninstall ConsoliAds option from your Unity editor if available in your older integrated version Or completely remove relevant files according to the respective plugin documentation
- Remove all errors from the Unity project: failure to do so otherwise will not let the prefab refresh and you may still see the old inspector values from the previous SDK. There is no more a Configure Server button on Unity in this SDK
- Go through the 12.x.x complete documentation: thoroughly read the new documentation as a lot has been changed to faster implement the new level of ease
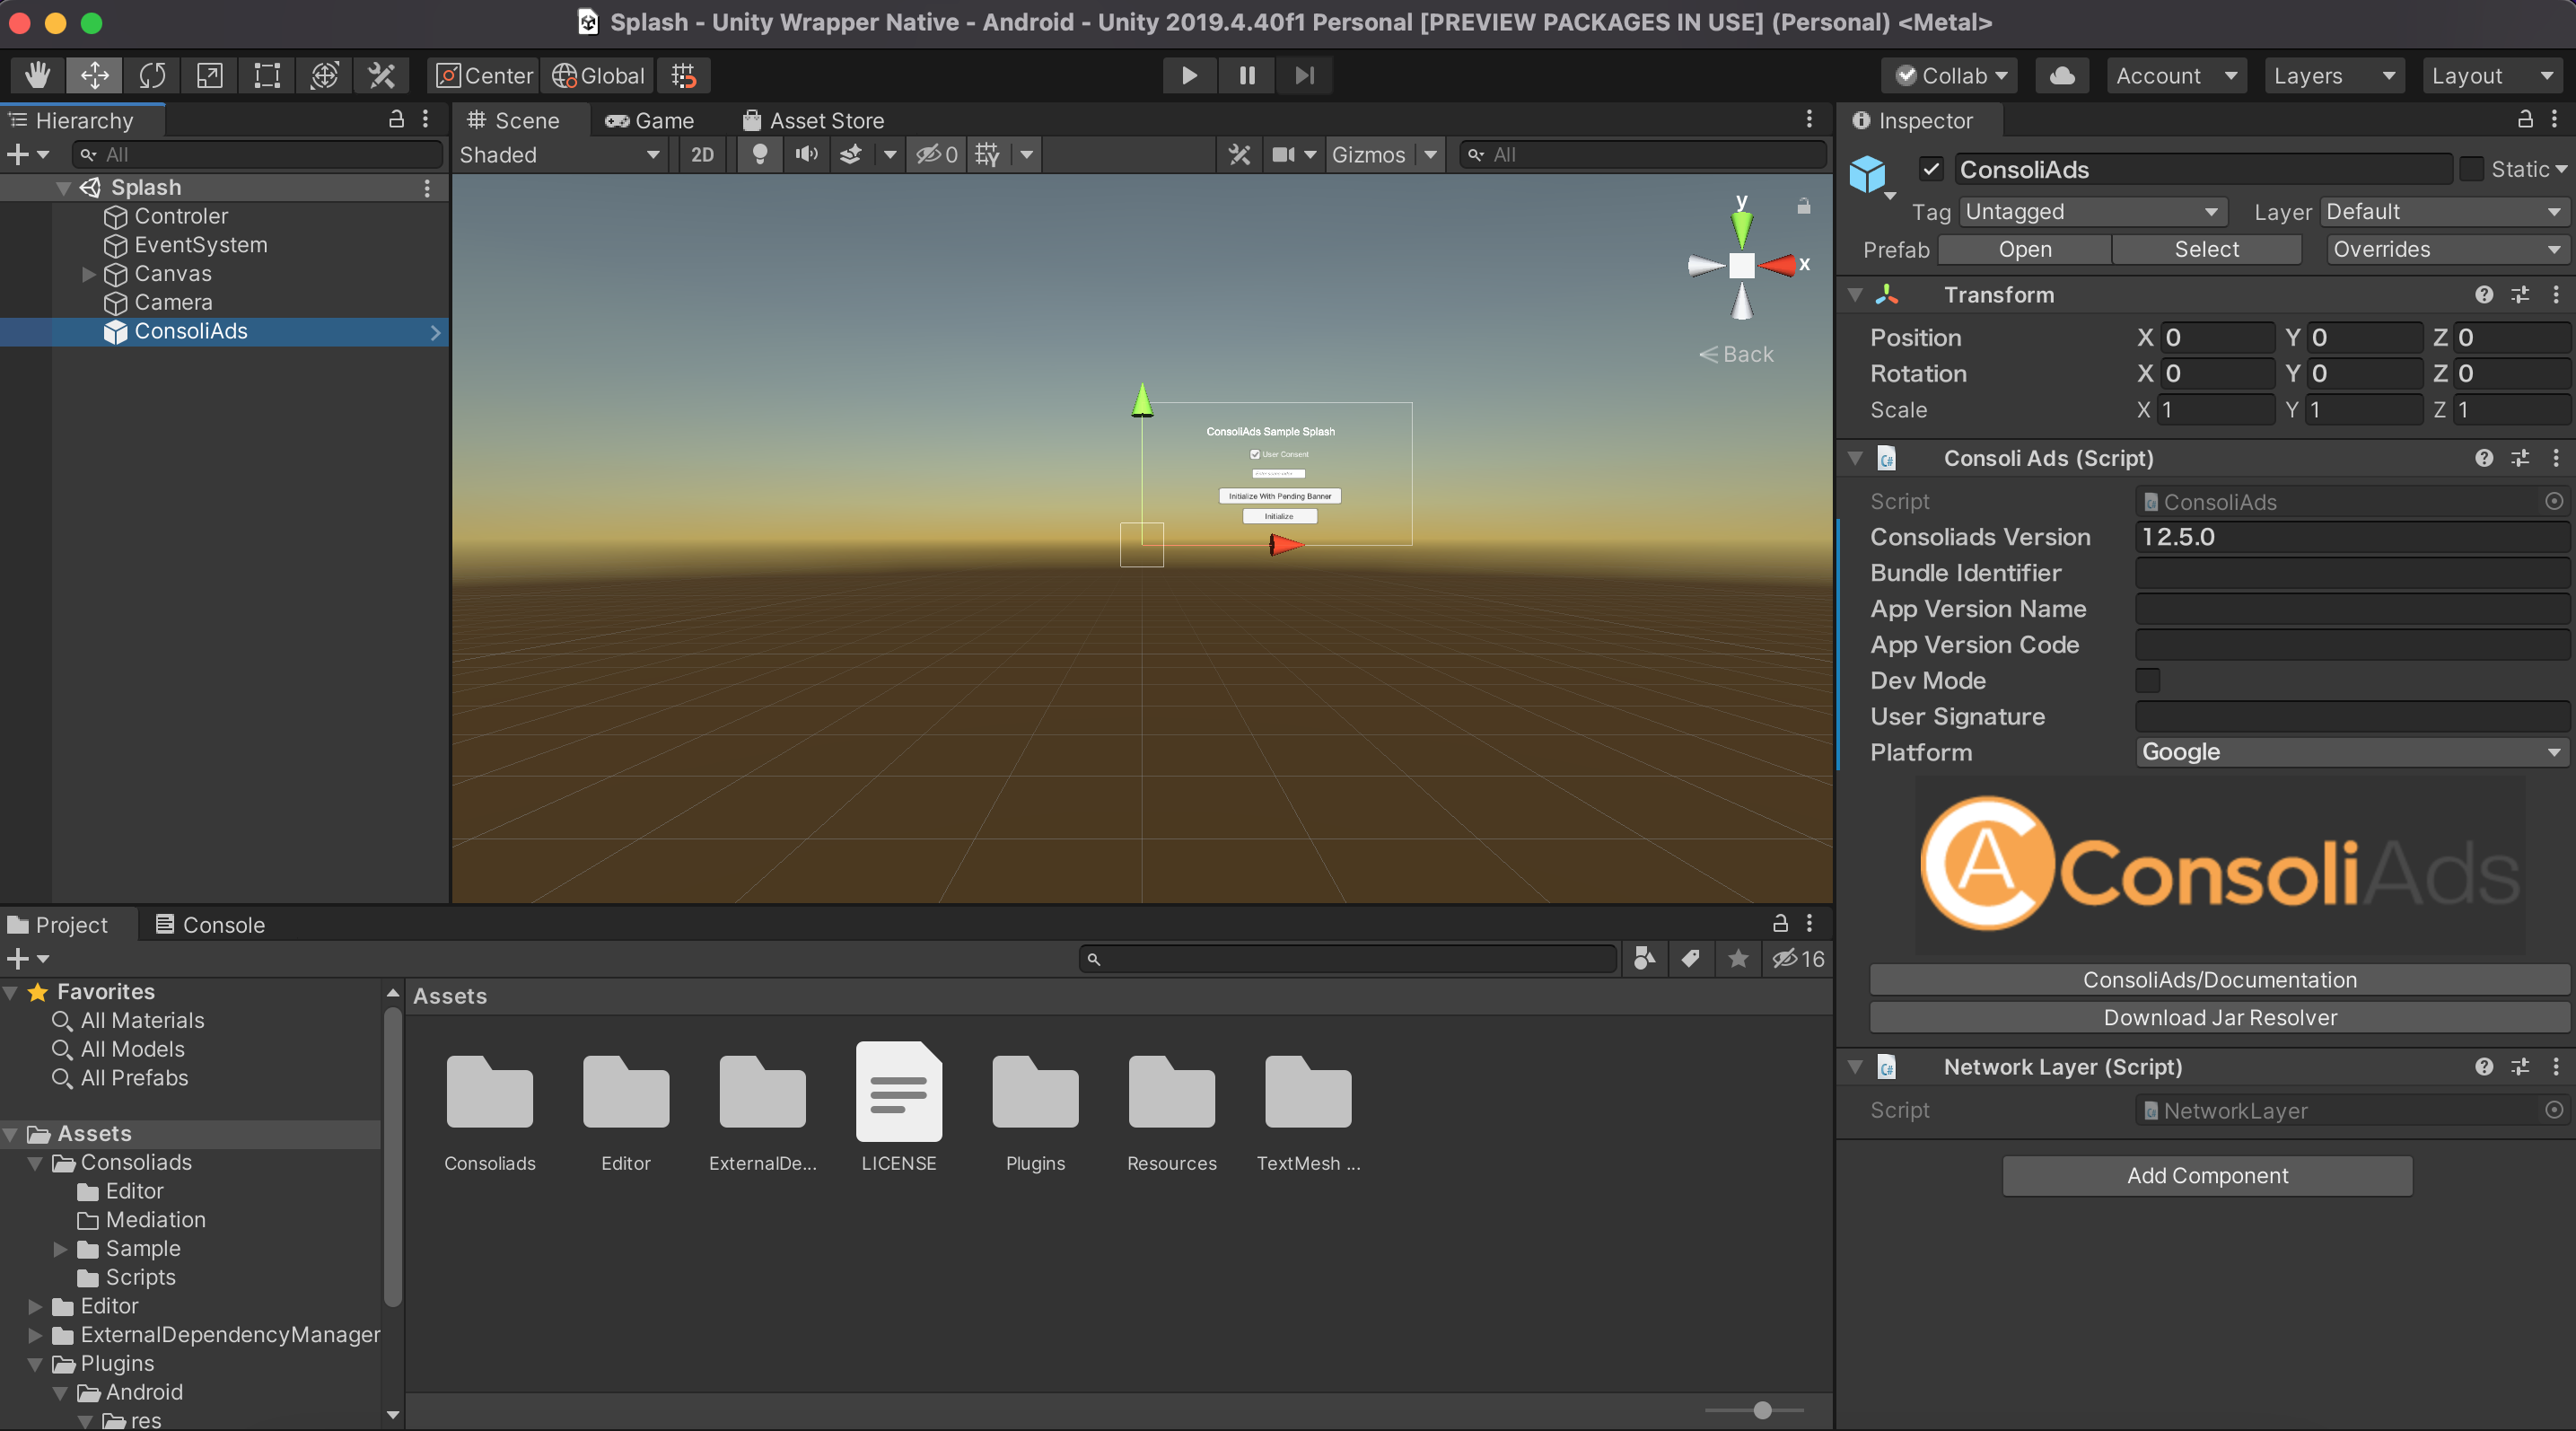
- Updated Unity Inspector: note that the new SDK only requires Dev Mode, User Signature and Platform configurations in the unity prefab inspector as shown below:
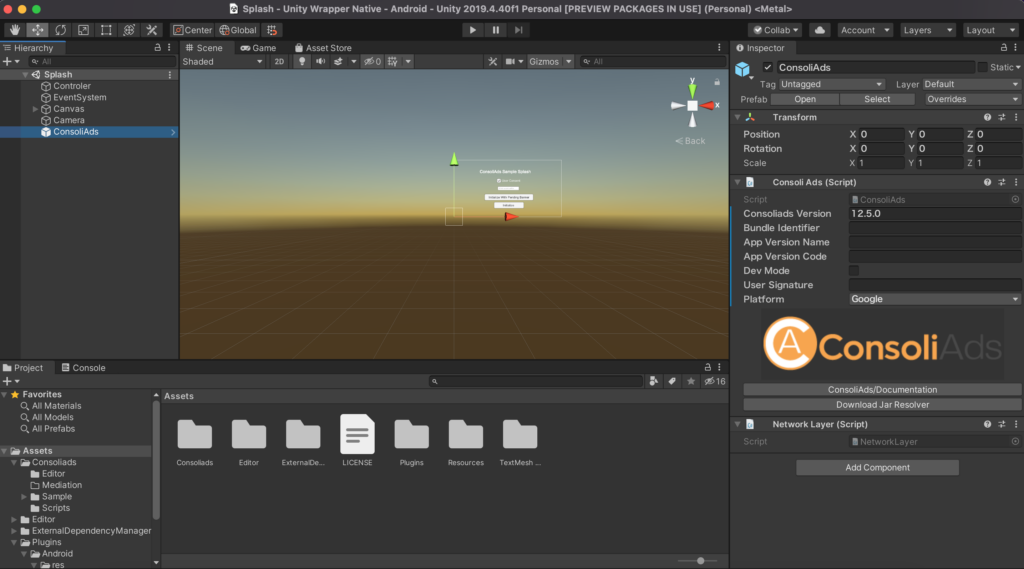
NOTE: Configure Server is NO MORE REQUIRED
The apps details of the versions older than 12.x.x appear on the ConsoliAds dashboard as follows:
Once you develop on the latest version and run your build on the DEV mode, your ConsoliAds dashboard will be updated to the latest mediation features as follows:

Please note that you will be able to add placeholders as per the SDK ENUMs once the dashboard is updated.
Create an App
NOTE: You can skip this step if you’ve already created your app on ConsoliAds dashboard
- From the left sidebar, navigate to Apps-> New App
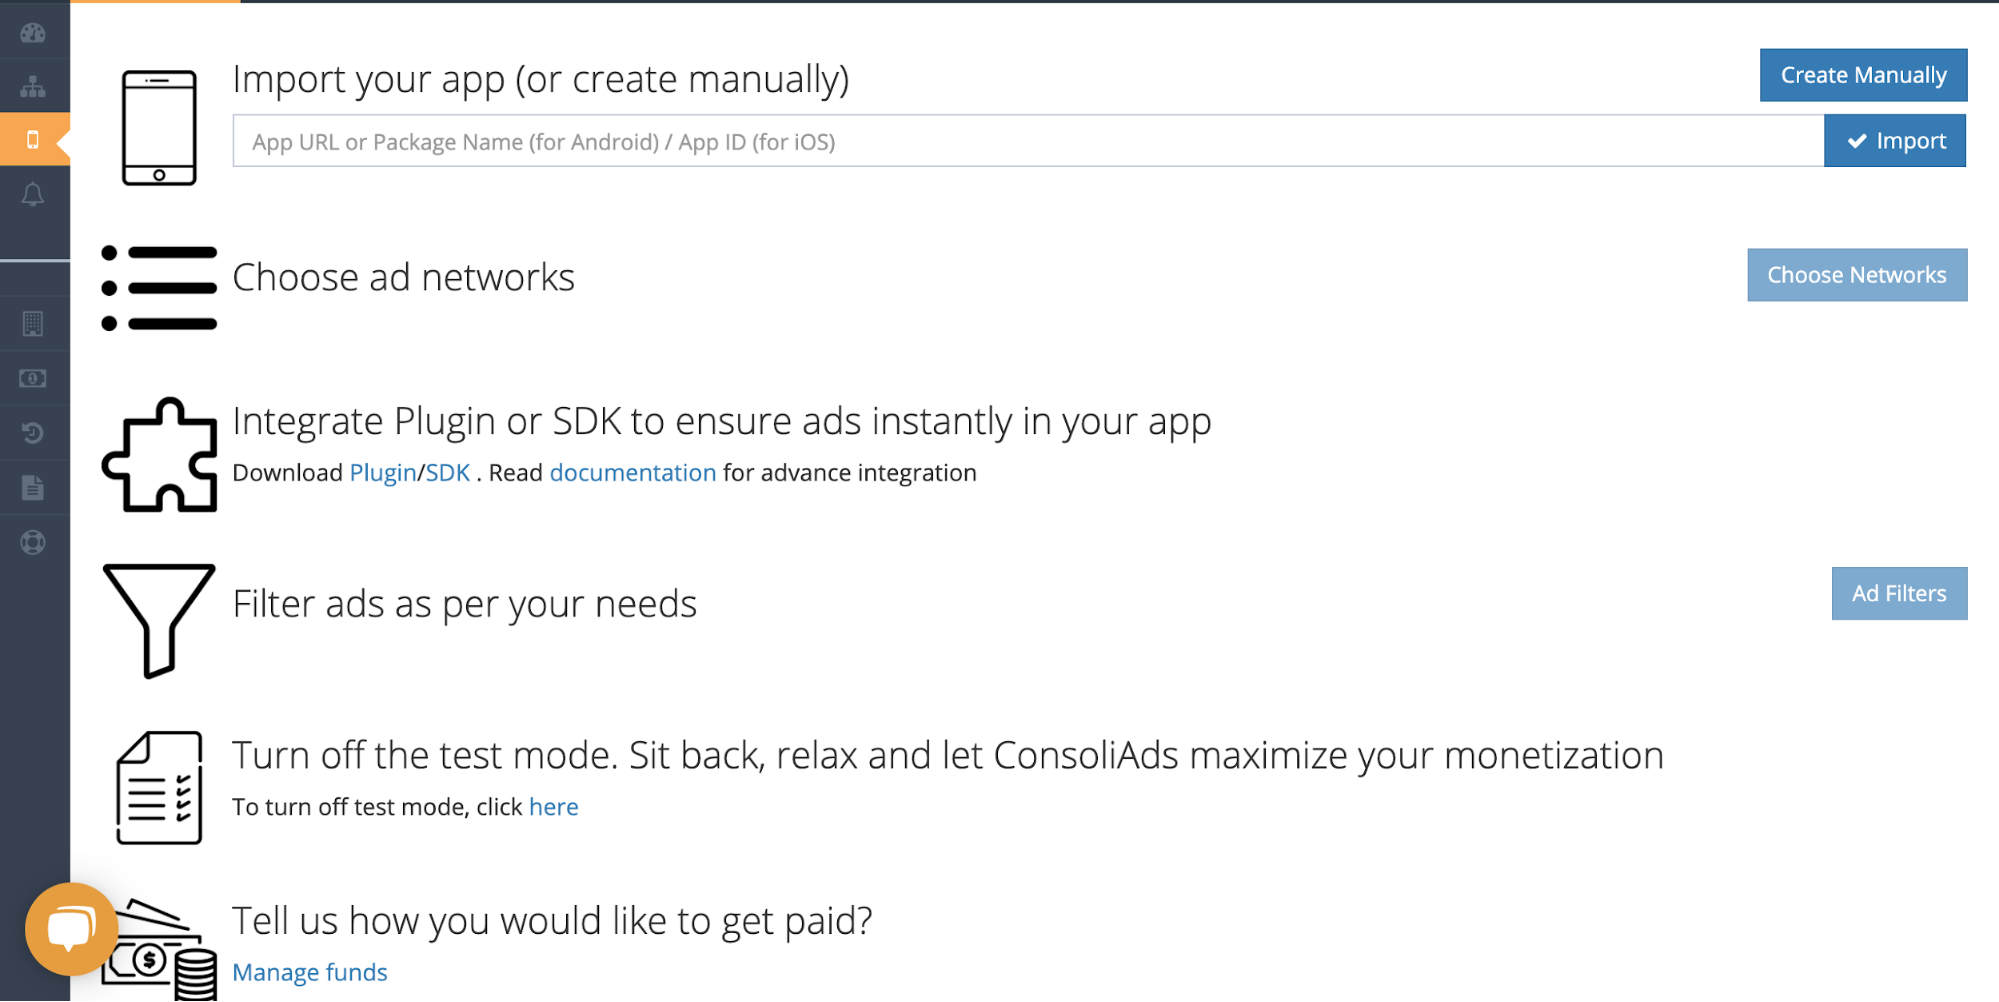
- Simply import your Live app or manually enter the required information and proceed to ‘Finish’ to instantly create your app
Download & Import SDK
- Download the latest ConsoliAds Mediation plugin for your required Unity version from https://portal.consoliads.com/download/unity
- Open your Unity Project and import the downloaded plugin; ignore any warnings that may appear
Add Prefab to your Scene
- In your project explorer, go to “AssetsConsoliAdsPrefab” or search for “ConsoliAds”
- Drag and drop ConsoliAds prefab into your first scene.
- Bundle identifier : the package name of your game (Note: it should be same as the package name added on portal or else the game won’t sync)
- App Version name: the identification Version (present in player settings) of your project
- App Version code: the Bundle Version Code of your project
- devMode: when true, it simulates the development environment and prevents developers from changing Live app settings. Complete app development should be done with ‘Dev Mode’ ON. When an app is ready to be published, ‘Dev Mode’ MUST BE turned OFF. (NOTE: Don’t forget to see ‘More About Dev Mode’ section before making the final build)
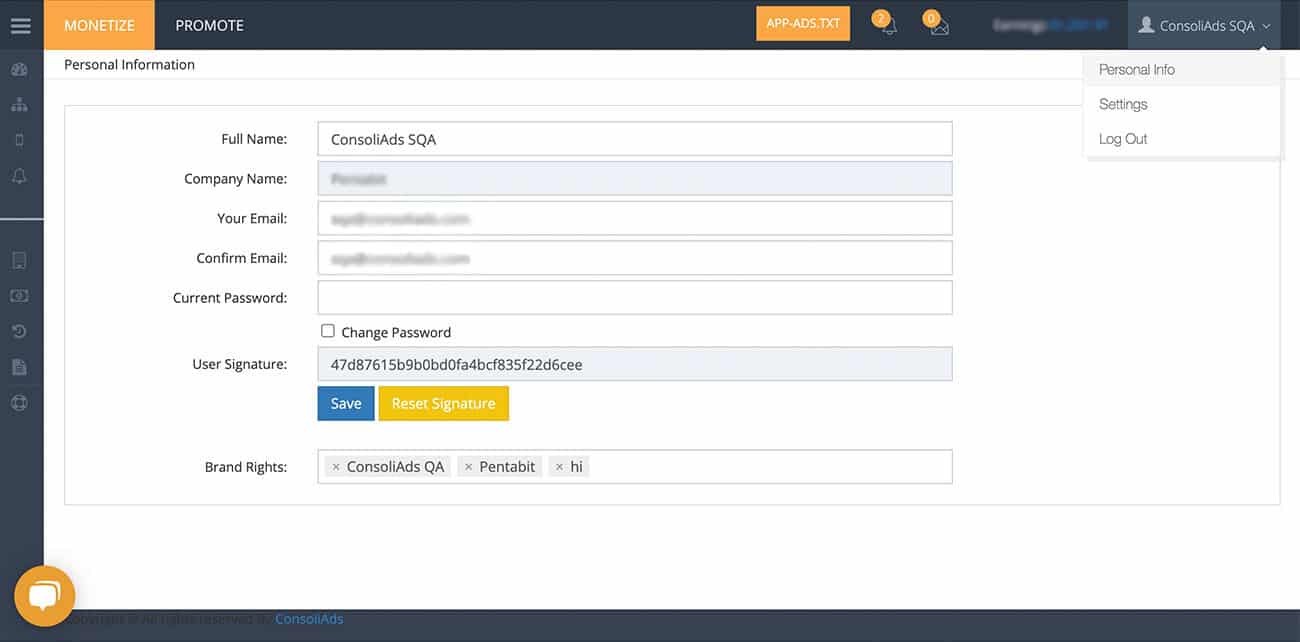
- userSignature: string to identify the user according to his role and rights provided on the ConsoliAds dashboard
- The user signature can be obtained by going to your Personal Info by clicking on your name in the right corner of the top bar on your dashboard
- Copy the required user signature for the above initialize argument
- Platform: enum to specify the build platform such as PlatForm.Google, PlatForm.Apple, PlatForm.Amazon
Ready to Code
Plugin Initialization
ConsoliAds mediation needs to be explicitly initialized, using the following code, once the prefab is active:
ConsoliAds.Instance.initialize(userConsent);
userConsent: TRUE if the user agrees to share his data and opts for personalized ads, FALSE otherwise. This flag is used for GDPR and CCPA compliance both.
NOTE: all initialize params cannot be modified once ConsoliAds is initialized
Display Interstitial/Video Ad
Load interstitial/Video Ad
Showing interstitial ads requires loading it beforehand. Use the following to load an interstitial ad:
ConsoliAds.Instance.LoadInterstitial();
OR
ConsoliAds.Instance.LoadInterstitial(PlaceholderName.Default);
It is highly recommended to call LoadInterstitial() as early as possible after ConsoliAds has been initialized, e.g. in the Start() method of a script, to allow the ad to be pre-loaded.
NOTE: calling LoadInterstitial multiple times does not result in multiple ad network requests
Check Interstitial/Video Ad Availability
Despite having the LoadInterstitial called, interstitial ad availability should be explicitly checked. Check interstitial ad availability by using the following methods:
ConsoliAds.Instance.IsInterstitialAvailable();
OR
ConsoliAds.Instance.IsInterstitialAvailable (PlaceholderName.Default);
PlaceholderName: enum of the placeholder (such as PlaceholderName.Default, PlaceholderName.MainMenu) from the ‘Placeholders’ tab in your app details of the ConsoliAds dashboard. No placeholder value is required if you do not have your own placeholders added.
Return value (boolean):
- True if the ad is available
- False if the ad is not available
Check Interstitial/Video Ad Clicked
To listen the Interstitial ad click callback implement the following block of code
In the Start() method of your script use the following code to attach your functions with ConsoliAds Interstitial Ad Clicked callback:
ConsoliAds.onInterstitialAdClickedEvent += onInterstitialAdClicked;
Provide the following definition of the method to use the Ad Clicked callback:
void onInterstitialAdClicked(string featureId)
     {
        Debug.Log("Sample: onInterstitialAdClicked called with featureId: " + featureId);
    }
FeatureID is used to identify the In-App feature clicked.
NOTE: Please make sure that the placeholder is also added on the dashboard before using
Show interstitial Ad
Add the following lines of code to show an interstitial ad in your app:
ConsoliAds.Instance.ShowInterstitial();
OR
ConsoliAds.Instance.ShowInterstitial(PlaceholderName.Default);
** BEST PRACTICE: A common effective way to display ads is by calling loadInterstitial in onInterstitialAdShownEvent. **
Static Interstitial Ad
To show an Image Only interstitial ad, enable the Static Interstitial option on your desired placeholder from the App Details-> Placeholders & Ads section as shown below:
Display Rewarded Video Ad
Load Rewarded Ad
Showing rewarded video requires loading it beforehand. Use the following to load a rewarded ad:
ConsoliAds.Instance.LoadRewarded();
OR
ConsoliAds.Instance.LoadRewarded(PlaceholderName.Default);
It is highly recommended to call LoadRewarded() as early as possible e.g. in the Start() method of a script to allow videos to be pre-loaded.
Check Rewarded Ad Availability
Despite having the ad load called, rewarded video availability should be explicitly checked. Check rewarded video ad availability by using the following method:
ConsoliAds.Instance.IsRewardedVideoAvailable ();
OR
ConsoliAds.Instance.IsRewardedVideoAvailable (PlaceholderName.Default);
PlaceholderName: enum of the placeholder (such as PlaceholderName.Default, PlaceholderName.MainMenu) from the ‘Placeholders’ tab in your app details of the ConsoliAds dashboard. No placeholder value is required if you do not have your own placeholders added.
Return value (boolean):
- True if the ad is available
- False if the ad is not available
Check Rewarded Ad Clicked
To listen to the Interstitial ad click callback, implement the following block of code
In the Start() method of your script use the following code to attach your functions with ConsoliAds Rewarded Video Ad Clicked callback:
ConsoliAds.onRewardedVideoAdClickEvent += onRewardedVideoAdClick;
Provide the following definition of the method to use the Ad Clicked callback:
void onRewardedVideoAdClick(string featureId)
     {
        Debug.Log("Sample: onRewardedVideoAdClick called with featureId : " + featureId);
     }
FeatureID is used to identify the In App feature clicked.
NOTE: Please make sure that the placeholder is also added on the dashboard before using
Show Rewarded Video
ConsoliAds.Instance.ShowRewardedVideo();
OR
ConsoliAds.Instance.ShowRewardedVideo(PlaceholderName.Default);
PlaceholderName: enum of the placeholder (such as PlaceholderName.Default, PlaceholderName.MainMenu) from the ‘Placeholders’ tab in your app details of the ConsoliAds dashboard. No placeholder value is required if you do not have your own placeholders added.
NOTE: Please make sure that the placeholder is also added on the dashboard before using
Reward Users
In order to reward your user, a callback needs to be implemented with your lines of code to incentivize the user. ConsoliAds mediation implements a single callback regardless of any ad network used.
In the Start() method of your script use the following code to attach your functions with ConsoliAds Rewarded Video Completed callback:
ConsoliAds.onRewardedVideoAdCompletedEvent += onRewardedVideoCompleted;
Provide the following definition of the method to reward your users:
public void onRewardedVideoCompleted(PlaceholderName placeholderName)

{

// Write your code to reward your user here

}
Display Banner Ad
To show banner ad you need to first create a ConsoliAdsBannerView object which can be initialized as:
ConsoliAdsBannerView consoliAdsBannerView = new ConsoliAdsBannerView();
Show Banner Ad
Now use the following code to display the banner:
ConsoliAds.Instance.ShowBanner(consoliAdsBannerView);
OR
ConsoliAds.Instance.ShowBanner(consoliAdsBannerView, PlaceholderName);
PlaceholderName: enum of the placeholder (such as PlaceholderName.Default, PlaceholderName.MainMenu) from the ‘Placeholders’ tab in your app details of the ConsoliAds dashboard. No placeholder value is required if you do not have your own placeholders added.
Check Banner Ad Clicked
To listen the Banner ad click callback implement the following block of code
In the Start() method of your script use the following code to attach your functions with ConsoliAds Banner Ad Clicked callback:
ConsoliAds.onBannerAdClickEvent += onBannerAdClick;
Provide the following definition of the method to use the Ad Clicked callback:
void onBannerAdClick(string featureId)
 {
   Debug.Log("Sample: onBannerAdClick called with featureId : " + featureId);
 }
Feature Id is used to identify the In App feature clicked.
NOTE: Please make sure that the placeholder is also added on the dashboard before using
Hide Banner Ad
To hide Banner, use the following:
ConsoliAds.Instance.HideBanner(consoliAdsBannerView);
//Add note if the hide banner is not called it will be visible throughout the scenes.
NOTE: NATIVE AD AND APP OPEN ADS ARE SUPPORTED SEPARATELY. YOU CANNOT USE BOTH ADS IN THE SAME APPLICATION.
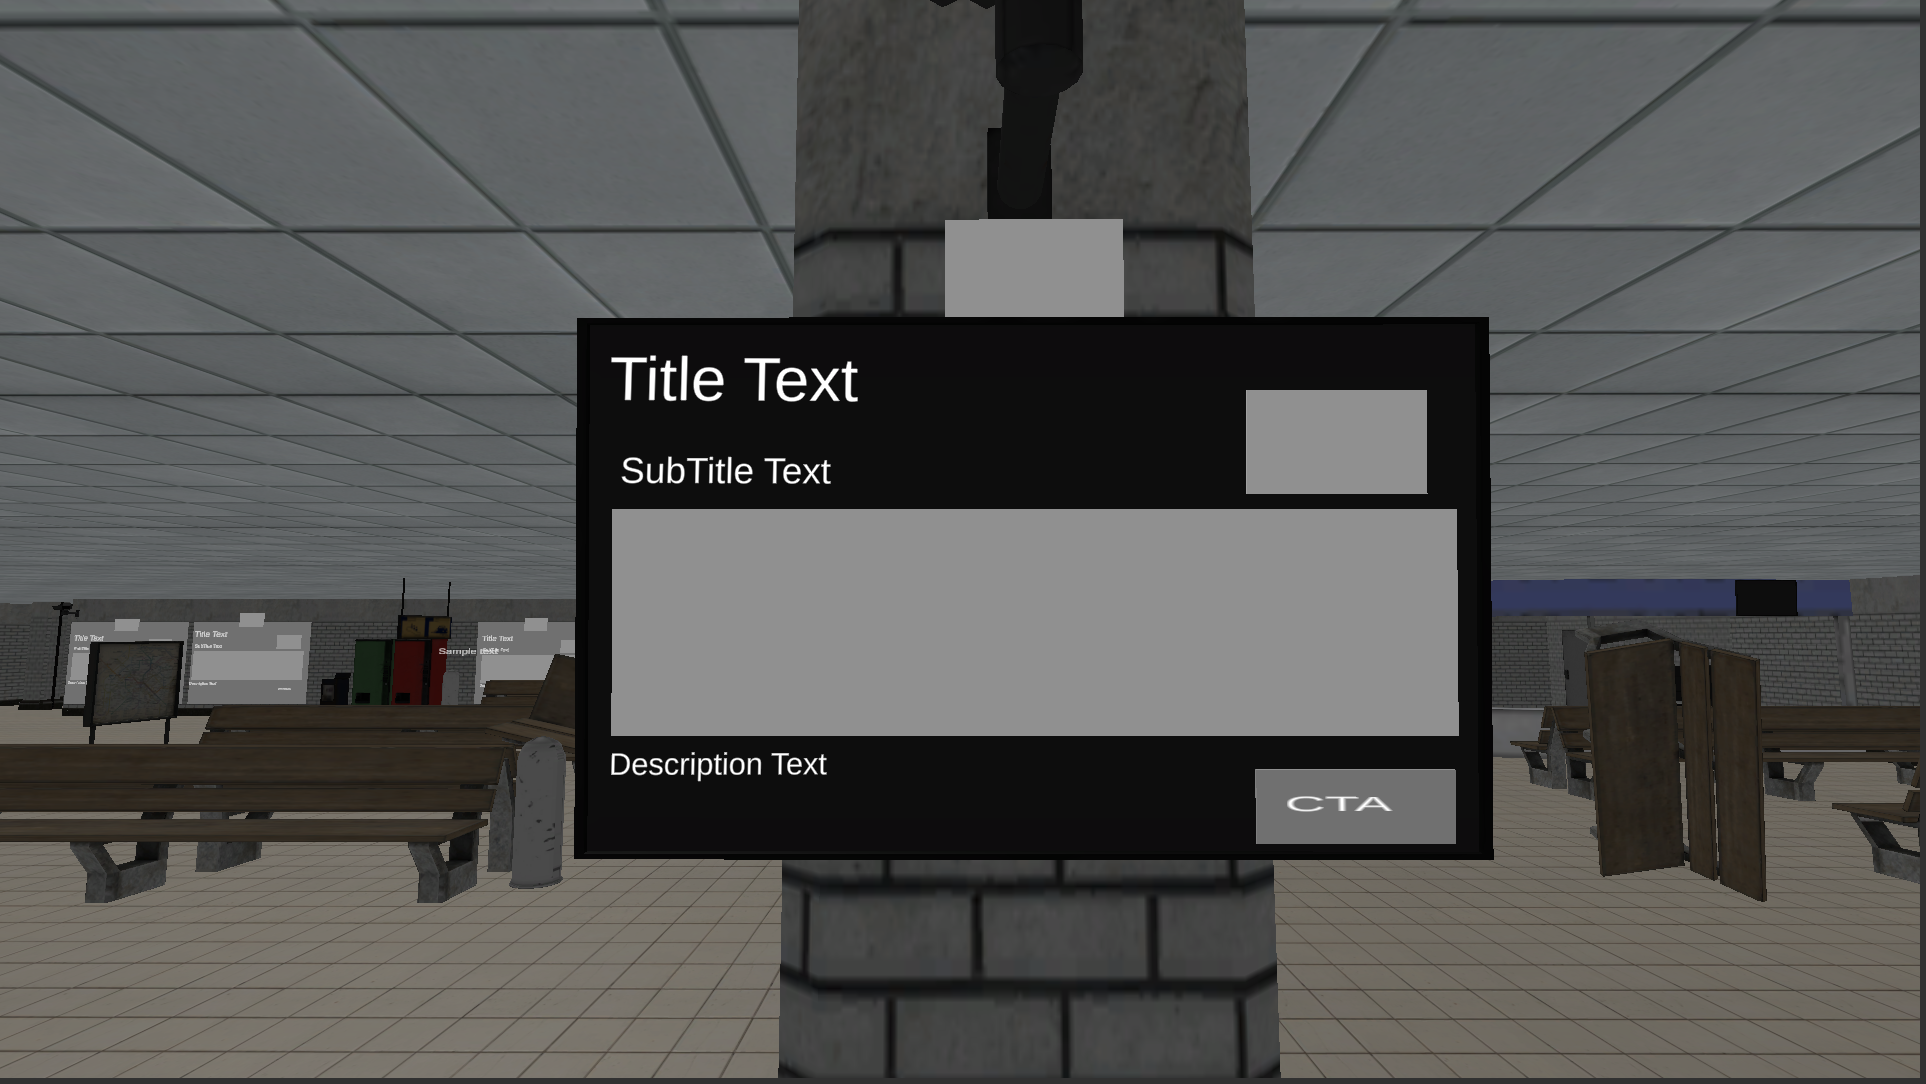
Display 3D Native Ad
When integrating 3D Native ads please keep the following prerequisites in mind:
Import Only “ADMOB NATIVE AD PLUGIN”.
If you are using 3D Native Ad Prefab then do the following steps:
- Drag the 3D Native Ad Prefab from the CA3DSample/Prefabs/ to the scene
- Adjust it where you want to show Native Ad.
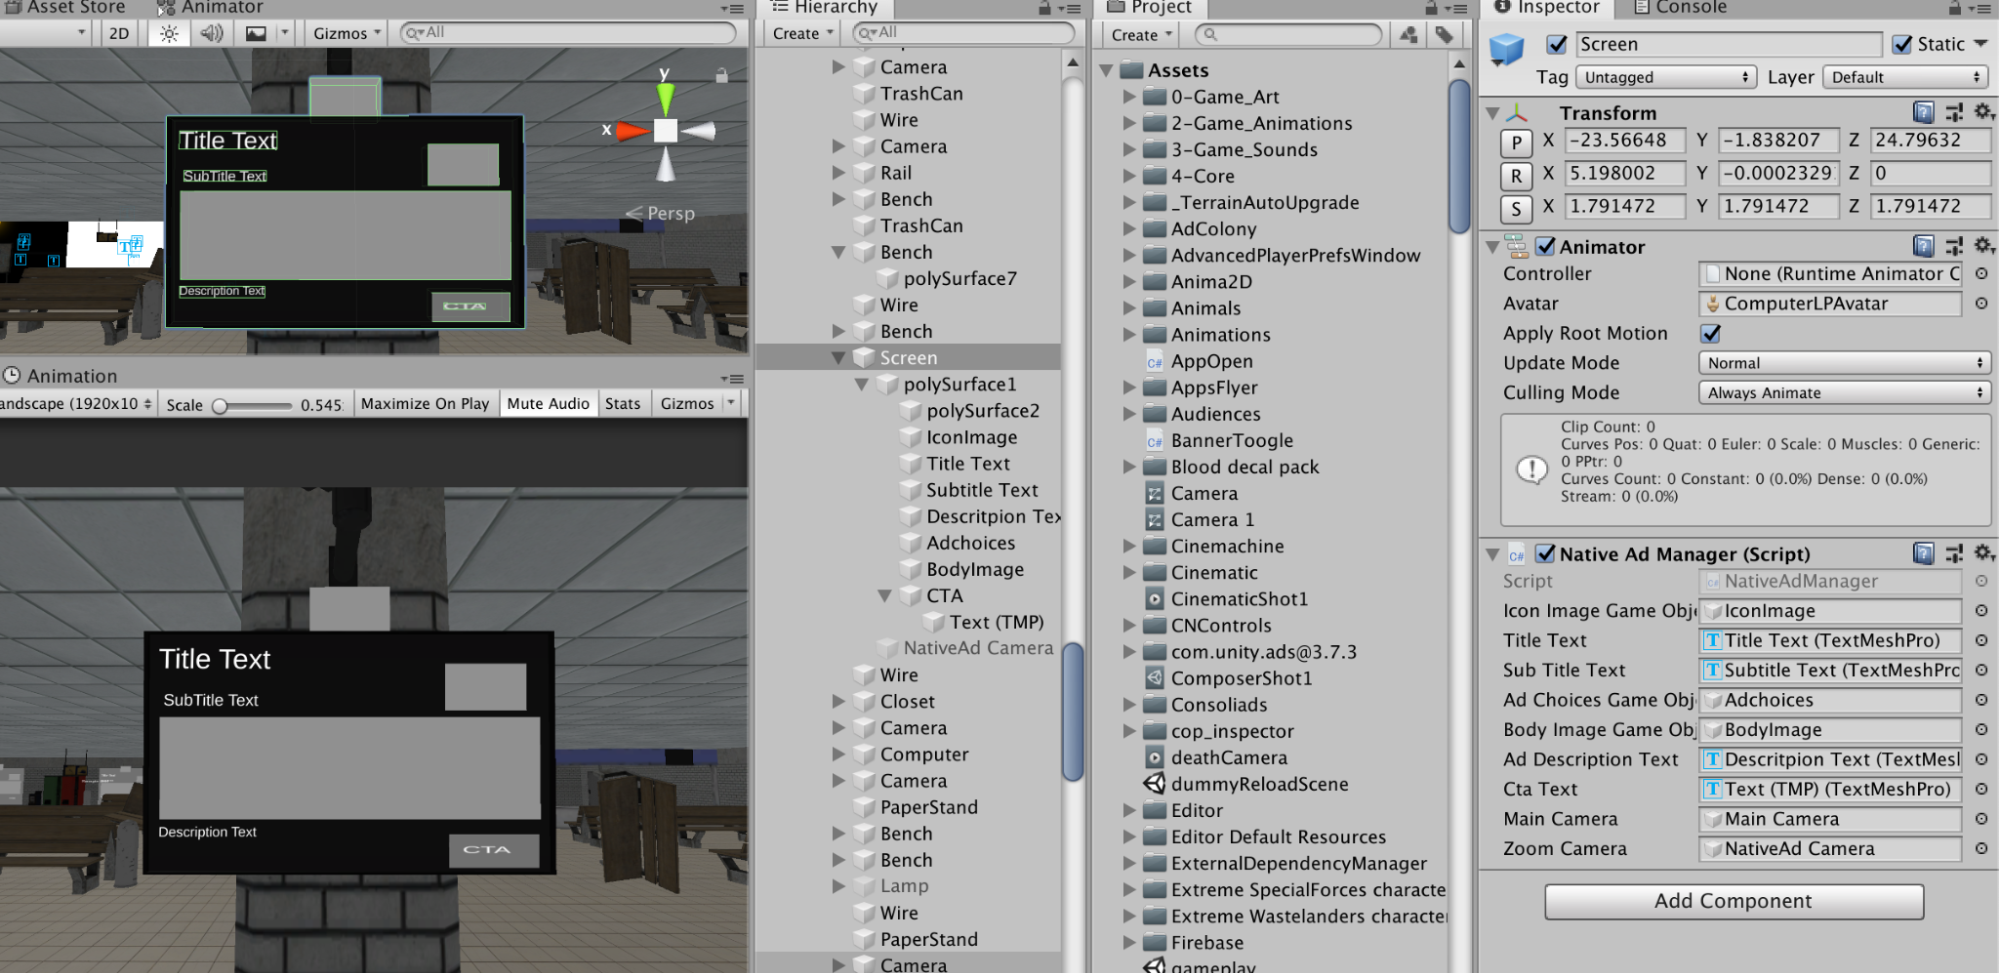
If you are not using 3D Native Ad Prefab then do the following steps:
- You have to create a 3D Structure by adding following components:
- Title Text (Type: TextMeshPro )
- SubTitle Text (Type: TextMeshPro)
- Description Text (Type: TextMeshPro)
- Icon Image (Type: Cube)
- Body Image (Type: Cube)
- Adchoices (Type: Cube)
- CTA (Type: Cube)
- CTA Text (Type: Text Mesh Pro)
- Camera (Adjust it on the Structure)
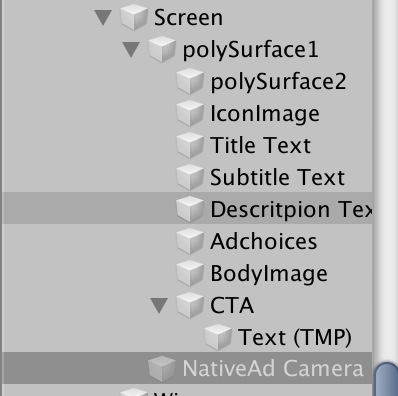
- Add 3D Box Collider on every object
- Attach “Native3DSample” to any active gameobject in the scene and pass all the references to the script.
3D Native ads integrated successfully.
Note: You must have to register every gameobject.
Every GameObject must have a Box Collider.
Please refer to Sample App for better understanding.
Display 2D Native Ad
When integrating 2D Native ads please keep the following prerequisites in mind:
If you are using 2D Native Prefab then do the following steps:
- Drag the Prefab to the scene.
- Change the Order Layer to 10.
- Adjust the View if needed.
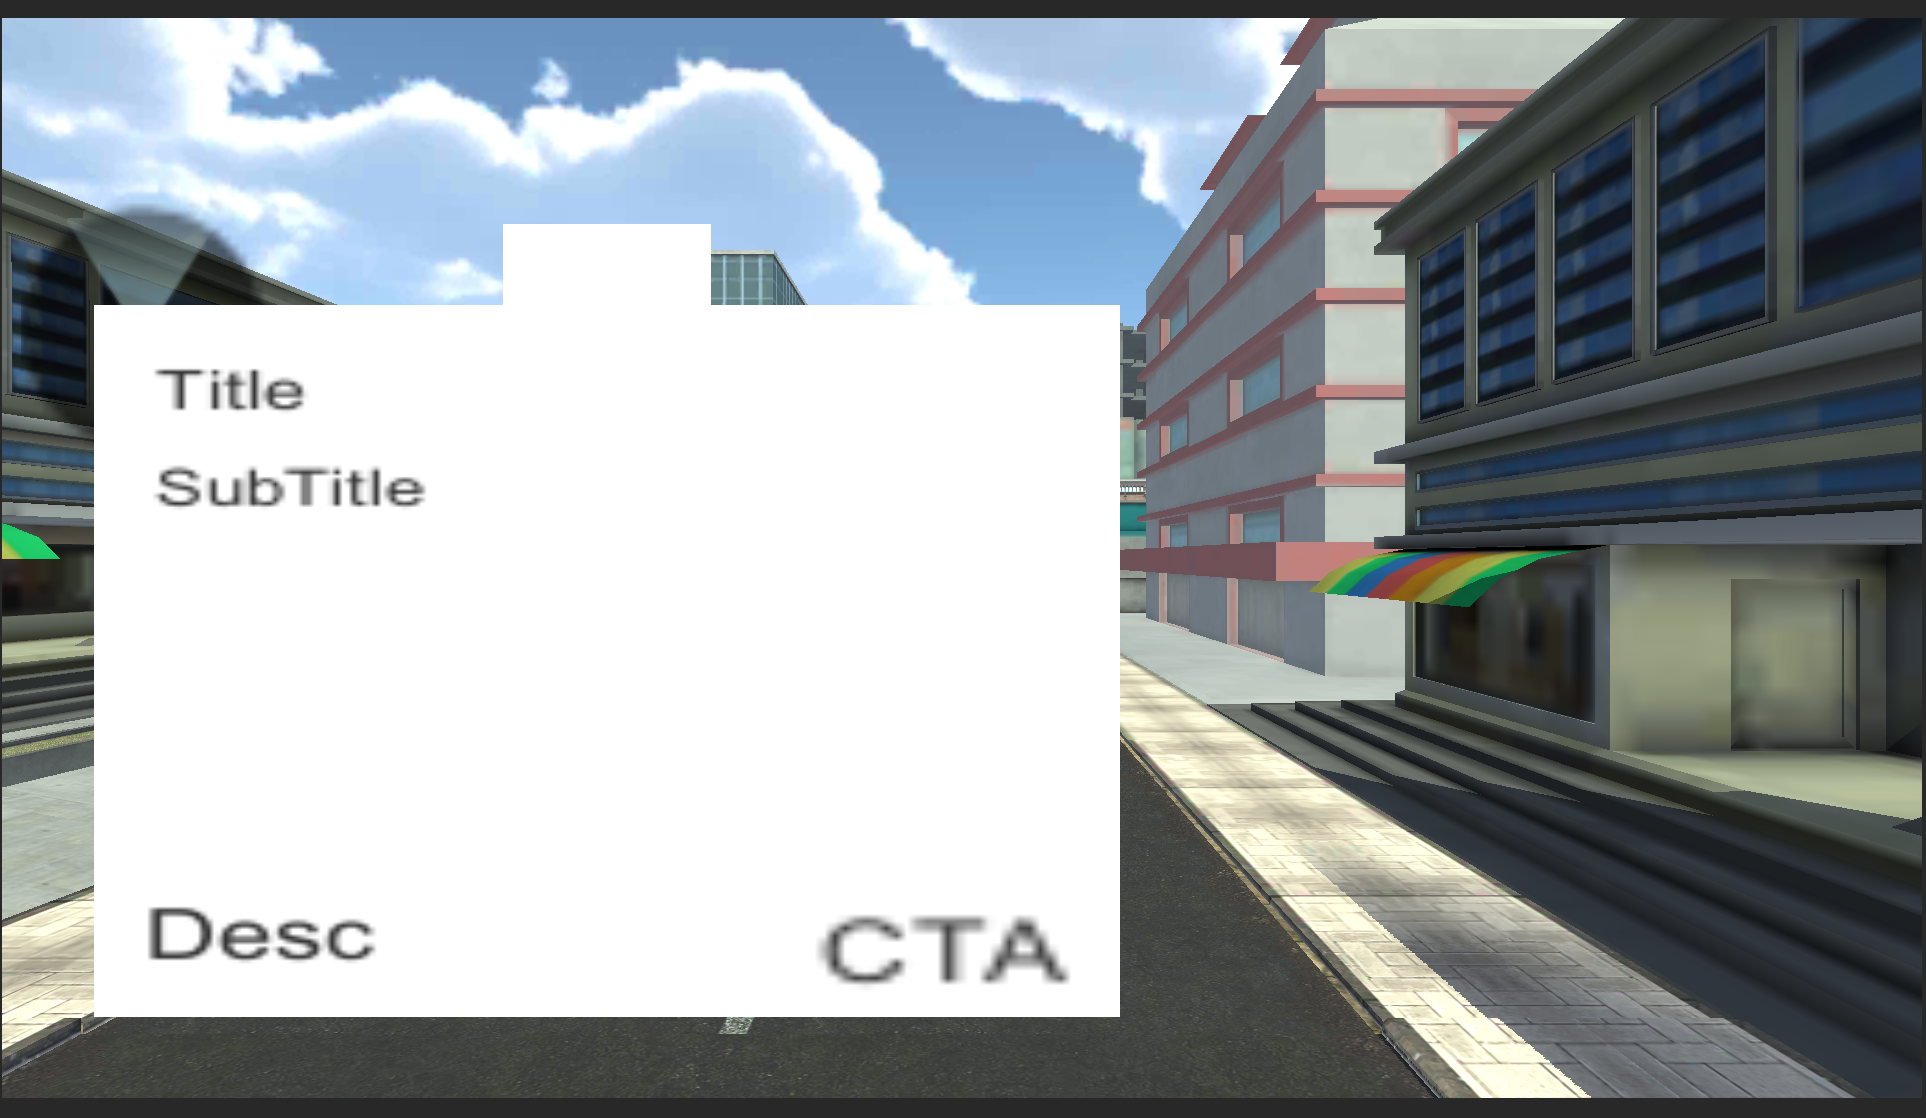
If you are not using 2D Native Prefab , then follow the below steps:
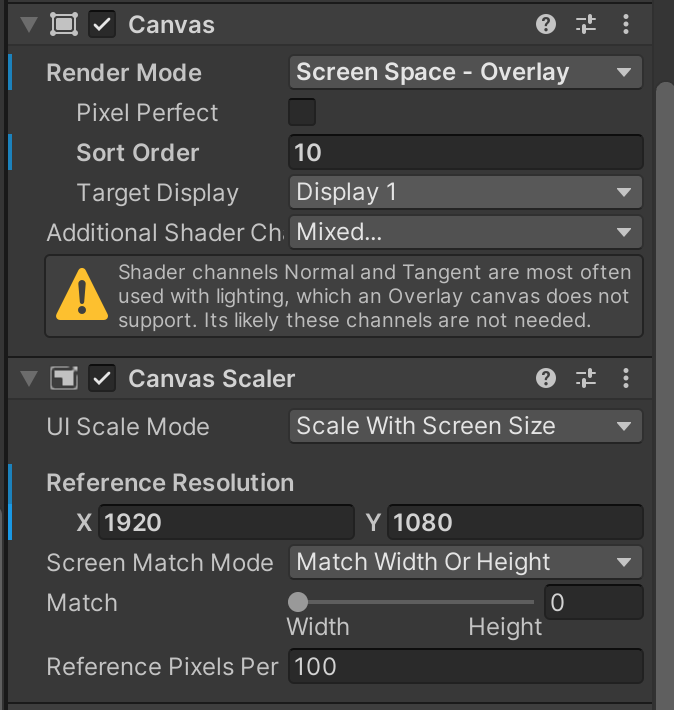
- Create a new Canvas in the scene.
- You have to create a 2D Structure by adding following components on the new Canvas:
- Title Text (Type: Text )
- SubTitle Text (Type: Text)
- Description Text (Type: Text)
- Icon Image (Type: Image)
- Body Image (Type: Image)
- Adchoices (Type: Image)
- CTAText(Type: Text)
- CTA (Type: Image)
- Add Box Collider on every object
- Change the Order Layer to 10.
- Change Canvas UI Scale Mode to “Scale With Screen Size”
- Adjust the Reference Resolution.
- Attach “Native2DSample” to this canvas object.
- Pass all the relevant objects as reference.
2D Native Ad is integrated successfully.
Active this NativeCanvasObject where you want to show.
Native ads mediation is supported for following ad networks:
Facebook, Admob, ConsoliAds ,Applovin ,StartApp,Mopub ,Mintegral, InMobi
Check Native Ad Clicked
To listen to the Interstitial ad click callback, implement the following block of code
In the Start() method of your script use the following code to attach your functions with ConsoliAds Native Ad Clicked callback:
ConsoliAds.onNativeAdClickEvent += onNativeAdClicked;
Provide the following definition of the method to use the Ad Clicked callback:
private void onNativeAdClickedEvent(object sender, System.EventArgs e)
    {
        CAFeatureEventArgs caFeature = (CAFeatureEventArgs)e;
        Debug.Log("Sample: NativeAd_OnNativeAdClickedEvent called with featureId : " + caFeature.featureId);
    }
featureId is used to identify In App feature clicked.
Display Icon Ad
Use the following steps to integrate icon ad :
- Create a simple UI Image Object on Canvas.
- Adjust its size position rotation according to your need.
- Create a script “IconAdManager”.
- Create a Gameobject, a boolean and CAMediatedIconAd.
public GameObject bottomLeftIconAdGameObject;
private bool isBottomLeftIconAdLoaded;
public CAMediatedIconAd bottomLeftMediatedIconAd = new   CAMediatedIconAd(IconAnimationType.PULSE, true);
5. To Load Icon Ad:
ConsoliAds.Instance.LoadIconAd(bottomLeftMediatedIconAd, PlaceholderName.Default);6. Register the Icon Ad Success Callback and set the boolean value to true.
bottomLeftMediatedIconAd.onIconAdLoadedSuccessEventHandler += HandleBottomLeftOnIconAdLoadedSuccessEventHandler;

private void HandleBottomLeftOnIconAdLoadedSuccessEventHandler(object sender, EventArgs e)
    {
        Debug.Log("Sample: HandleBottomLeftOnIcondLoadedSucceededEventHandler called for : ");

        isBottomLeftIconAdLoaded = true;
    }
7. In Update(), check for the boolean value if its loaded then show it.
(Important: You must have to register it to make it clickable)
if (isBottomLeftIconAdLoaded)

{
  isBottomLeftIconAdLoaded = false;

      bottomLeftIconAdGameObject.SetActive(true);

            bottomLeftMediatedIconAd.RegisterIconImageGameObject(bottomLeftIconAdGameObject);
 }
8. Attach this script to any active gameobject and drag your icon ad image object you created on canvas to this script as reference.
Icon Ad Animation:
ConsoliAds supports pre-defined animations of icon ads. You need to pass the following animation type enum in the show call:
- NONE
- SHAKE
- PULSE
Consoliads facilitate you to choose finite or infinite animation
- true: the animation will continue throughout the life of IconAd.
- false: the animation will stop after a specific time and then restart animation for icon on refresh
Check Icon Ad Clicked
To listen to the Interstitial ad click callback, implement the following block of code
In the Start() method of your script use the following code to attach your functions with ConsoliAds Interstitial Ad Clicked callback:
mediatedIconAd.onIconAdClickedEventHandler += OnIconAdClickedEventHandler;
Provide the following definition of the method to use the Ad Clicked callback:
private void onIconAdClickedEventHandler(object sender, EventArgs e)
    {
      CAFeatureEventArgs caFeature = (CAFeatureEventArgs)e;
      Debug.Log("Sample: HandleBottomRightOnIconAdClickedEventHandler called with featureId : " + caFeature.featureId);
    }
FeatureID is used to identify the In App feature clicked
Icon Ad is successfully integrated.
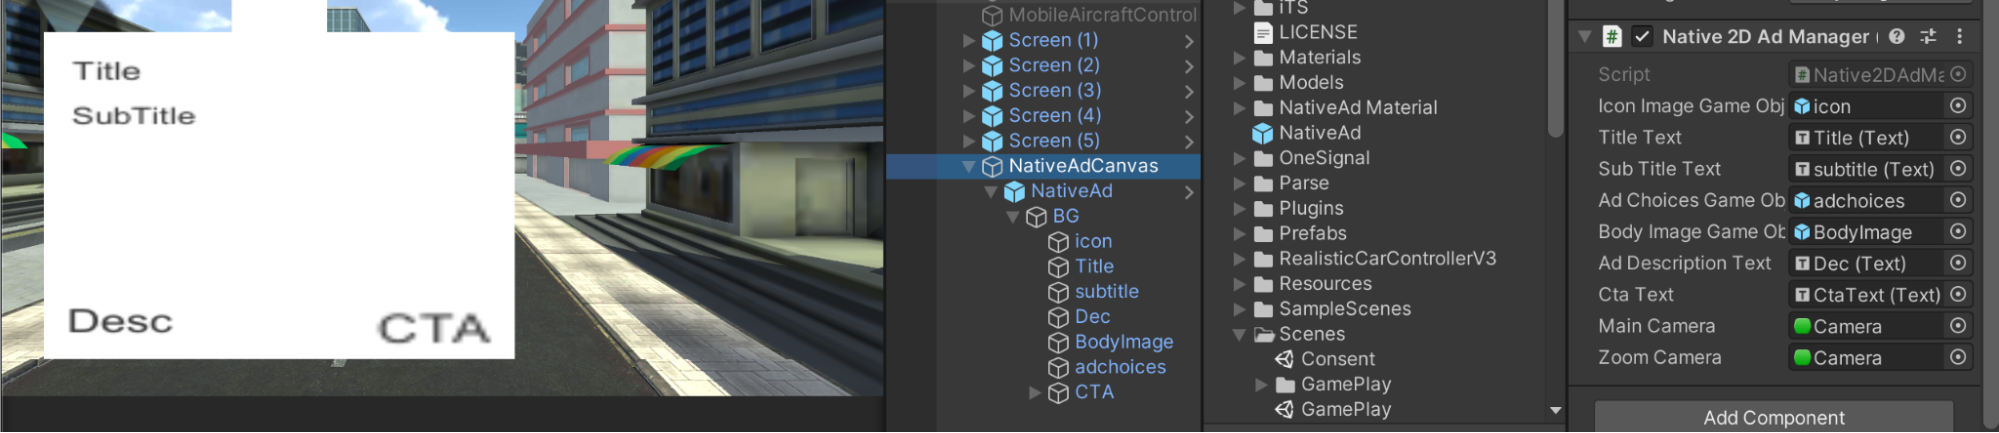
Display Immersive Ads
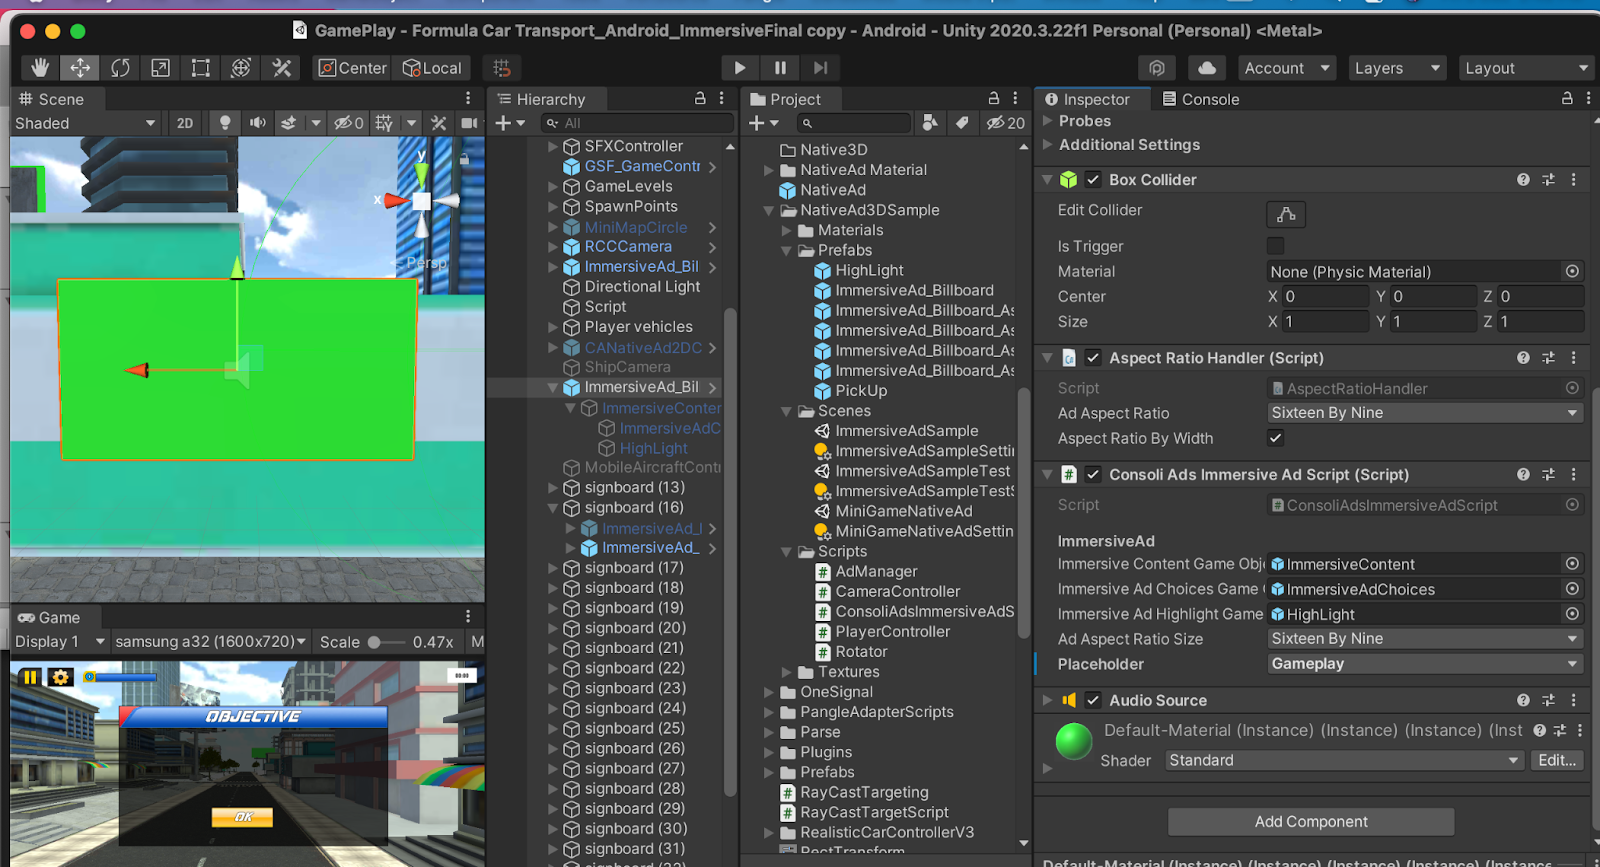
- Right click in the hierarchy tab and from the drop down menu select ConsoliAds -> ImmersiveAd.
- From the dropdown select the desired aspect ratio for ImmersiveAds. ConsoliAds supports five aspect ratios (1:1, 3:2, 4:3, 16:9, 18:6)
- Once the ImmersiveAd gameobject is added into the hierarchy, it will load and display the Ad automatically.
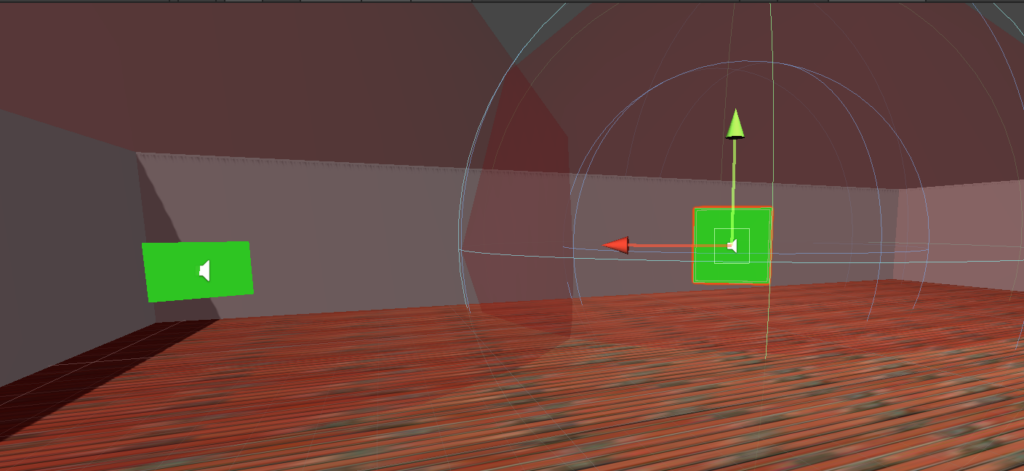
- While changing the size of the immersive ad the color of the immersiveAd notifies if the size of the immersiveAd will be supported or not. (Green color means that the size selected is supported.)
- Another way to adjust the size of the immersiveAd is by using the scale. The scale will automatically maintain the aspect ratio.
- Aspect ratio of the immersive is maintained by two different points that are:
- maintain aspect ratio by WIDTH
- maintain aspect ratio by HEIGHT
Note : By default the aspect ratio will be set by the WIDTH. You can change that by unchecking the checkbox on the inspector of the selected gameobject of the immersiveAd, in the AspectRatioHandler component.
- ImmersiveAds are clickable if they are in the view of the Unity camera in a close distance. Once the ImmersiveAd is close enough and fully displayed on the screen it will start animating, showing the user that the ad is clickable(ClickMe button).
- ImmersiveAd Audio is played whenever the user is in the effective area of the immersiveAd. Graphical representation has been added for the ease of the client so that while placing immersiveAd it is ensured that the audio of multiple ImmersiveAds don’t play at once.
- ImmersiveAd contains both image and/or video and will refresh after 30 seconds.
- ImmersiveAd will not play if the Time.TimeScale is 0 and video will be paused.
- ImmersiveAd gives an impression after 2 seconds if the Ad is still being viewed after 2 seconds.
- The impression and click of the immersiveAd will work as per the scale/size of the ImmersiveAd.The Standards click/impression units measurement are :
- 2-5 Scale / Size : 7 unit distance.
- 6-10 Scale / Size : 14 unit distance.
- 11-50 : 35 unit distance.
- 51-100 : 50 unit distance.
- 100+ : 100 unit distance.
Note : 1 unit in Unity is equal to 1 Meter so if the Ad is 2 meters in width and 5 meters height the distance to make it clickable will be 7 meters and vice versa.
Using Immersive Ad with Multiple Cameras
While using multiple cameras it needs to be ensured that “CAAssignImmersiveCamera” script is attached to the camera which is being used currently.
**You can attach the “CAAssignImmersiveCamera” script to multiple cameras but only one of the cameras should be enabled at a time.**
Immersive Ad Clicked Event
To listen to the Immersive ad click event implement the following block of code
In the Start() method of your script use the following code to attach your functions with ConsoliAds Interstitial Ad Clicked callback:
immersiveAd.onImmersiveAdClickedEventHandler += onImmersiveAdClickedEventHandler;
Provide the following definition of the method to use the Ad Clicked callback:
private void onImmersiveAdClickedEventHandler(object sender, System.EventArgs e)
    {
        CAFeatureEventArgs caFeature = (CAFeatureEventArgs)e;
        Debug.Log("Sample: ImmersiveAd_onImmersiveAdClickedEventHandler with featureid : " + args.featureId);
    }
Note : FeatureID is used to identify the In App feature clicked.
Display App Open Ad
Please follow the steps to integrate App Open Ads:
- Import “ADMOB APP OPEN AD PLUGIN” Only:
Load App Open Ad
Load App Open Ad on Consoli Ads Initialization Callback and set its orientation according to your need.
ConsoliAds.Instance.LoadAppOpenAds(ScreenOrientation.Landscape);
OR
ConsoliAds.Instance.LoadAppOpenAds(ScreenOrientation.Landscape,PlaceholderName.Default);
PlaceholderName: enum of the placeholder (such as PlaceholderName.Default, PlaceholderName.MainMenu) from the ‘Placeholders’ tab in your app details of the ConsoliAds dashboard. No placeholder value is required if you do not have your own placeholders added.
Check App Open Ad Availability
Check App Open ad availability by using following method:
ConsoliAds.Instance.IsAppOpenAdsAvailable();
OR
ConsoliAds.Instance.IsAppOpenAdsAvailable(PlaceholderName.Default);
PlaceholderName: enum of the placeholder (such as PlaceholderName.Default, PlaceholderName.MainMenu) from the ‘Placeholders’ tab in your app details of the ConsoliAds dashboard. No placeholder value is required if you do not have your own placeholders added.
Return value (boolean):
- True if the ad is available
- False if the ad is not available
Show App Open Ad
- To Show App open Ad on Loading Screen , call the following :
ConsoliAds.Instance.ShowAppOpenAds(ScreenOrientation.Landscape);
OR
ConsoliAds.Instance.ShowAppOpenAds(ScreenOrientation.Landscape,PlaceholderName);
App Open ads are integrated successfully.
Hide All Ads
If you want to hide all ads, except Rewarded Ads, from your entire app to implement any game logic or in-app purchase, use the following:
ConsoliAds.Instance.hideAllAds();
NOTE: You only need to call this method once in your script to hide all ads from your app
Using More Apps URL and Support Email
- The more apps URL and support email are added against a particular brand from the ConsoliAds dashboard
- To access more apps URL, use:
ConsoliAds.Instance.MoreFunURL()
- To access support email, use:
ConsoliAds.Instance.SupportEmail()
Build and Run
Enable the Dev Mode checkbox in “ConsoliAds” prefab. Build and Run your project, this will sync your project settings with the application on the portal. There is no more Configure Server.
More About ‘Dev Mode’
- Please note that the ‘Dev Mode’ has its own following settings to modify your app under development before impacting the LIVE app:
- Test Mode
- Hide All Ads
- If you make your build with ‘Dev Mode’ enabled, the ad configurations from ‘Dev. Placeholder and Ads‘ tab on the dashboard would be used.
- If you make your build with ‘Dev Mode’ disabled, the ad configurations from ‘Live Placeholder and Ads‘ tab on the dashboard would be used.
- After adding or editing Ad IDs for Admob, Chartboost or Facebook. It is necessary to click the “Apply to Live” button to be applied on Live placeholders and ads
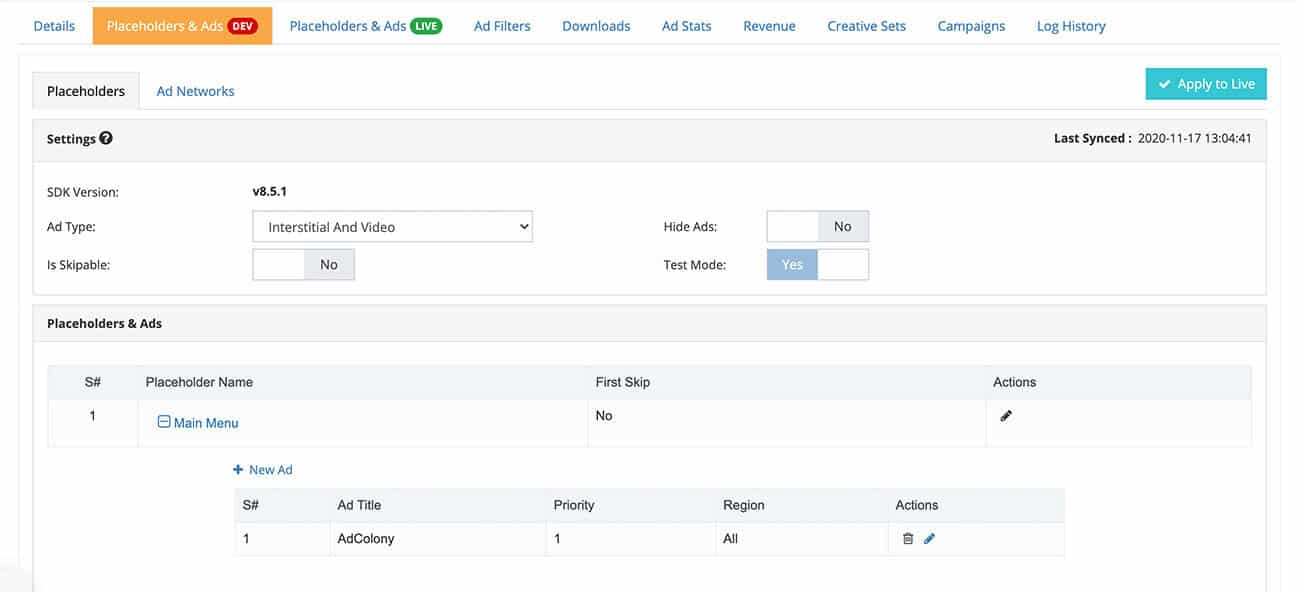
Applying Dev Settings to Live
In order to see the ‘Dev Mode’ settings on ConsoliAds dashboard, open the ‘Placeholder & Ads (DEV)‘ tab in the details of your specific app as shown below:
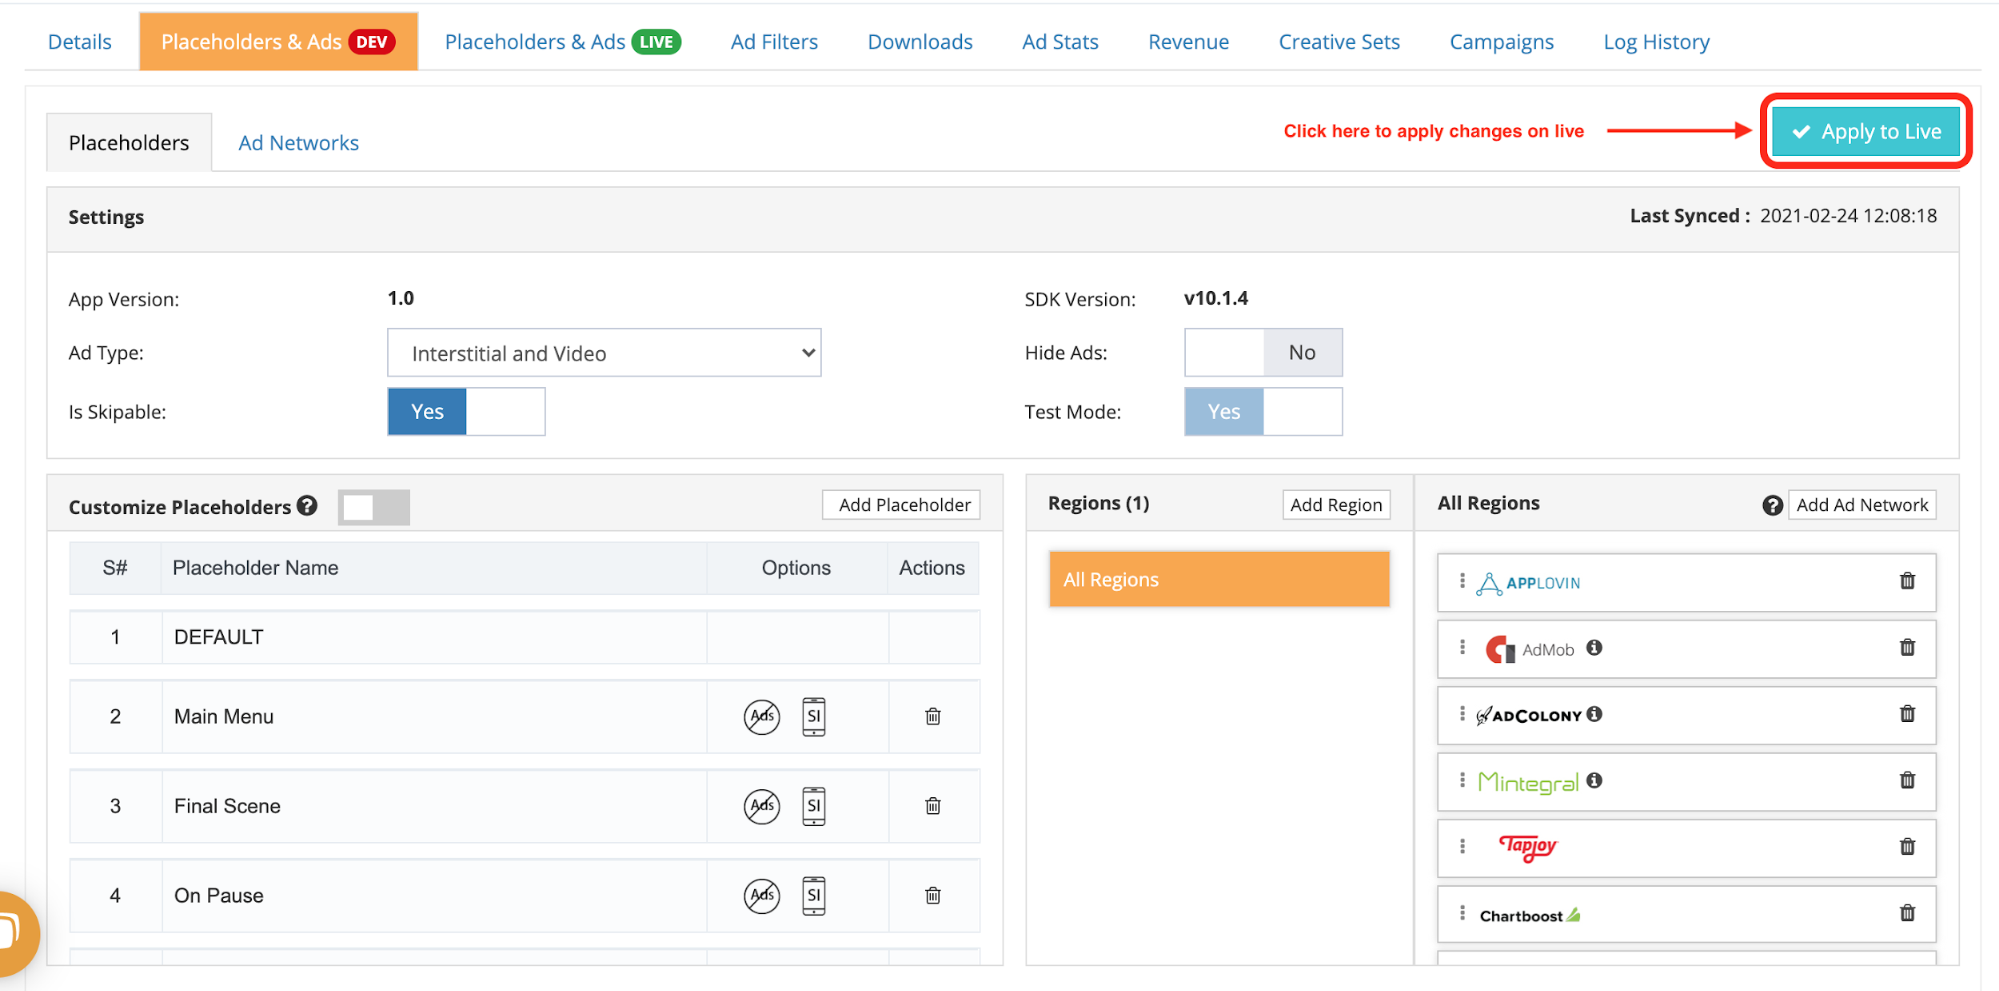
Click ‘Apply to Live’ to apply these configurations to your live app.
NOTE: if the configurations are mistakenly applied to LIVE, you can undo by modifying the DEV configurations and applying again.
Add Ad Network
- Log in to your ConsoliAds dashboard and download your required ad network standalone plugin from https://portal.consoliads.com/download/adnetworksdk/unity
- Double click on the downloaded package
- A dialog box will appear, select All and click on “Import”.
Additional Settings for some Ad Networks
Admob
NOTE: You can skip this step if you are not using Admob ad network plugin OR if you are not building for Android
Need to add an Admob AppId if you are using Admob.
Following are the steps to add an Admob AppId for Android/iOS in your unity editor.
Please go to Assets -> Google Admob Ads -> Settings.
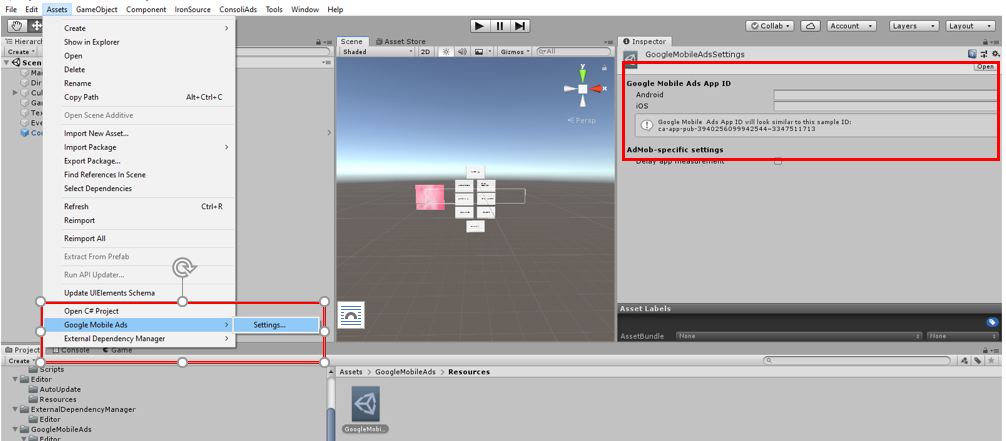
NOTE: ca-app-pub-3940256099942544~3347511713 is a test Application ID. You need to make sure that you add your Admob APPLICATION_ID available from your Admob dashboard.
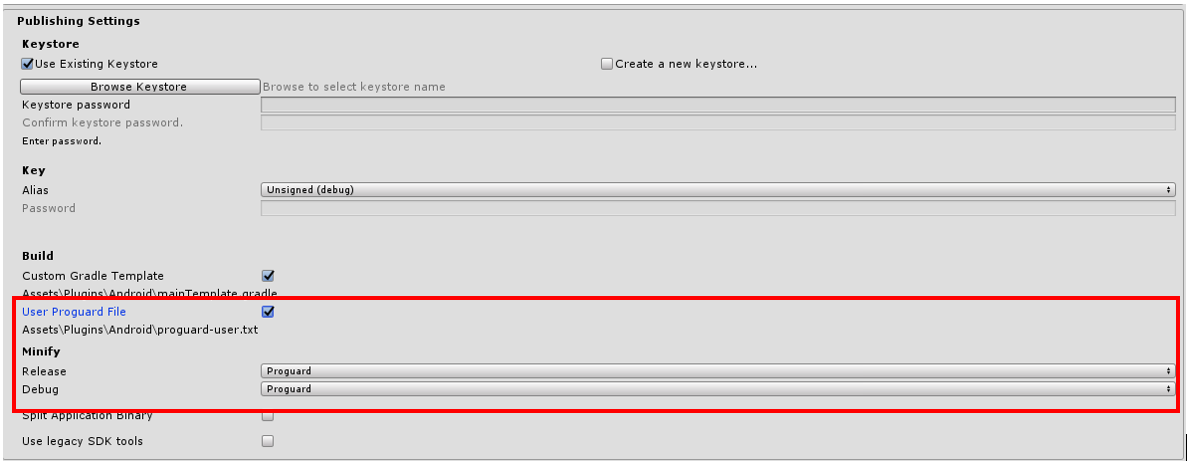
Pangle
For Pangle in Player settings activate Proguard for both Debug and Release
Add following lines in pro-guard-user.txt file
-keep class com.bytedance.sdk.** { *; }
-keep class com.pgl.sys.ces.* {*;}
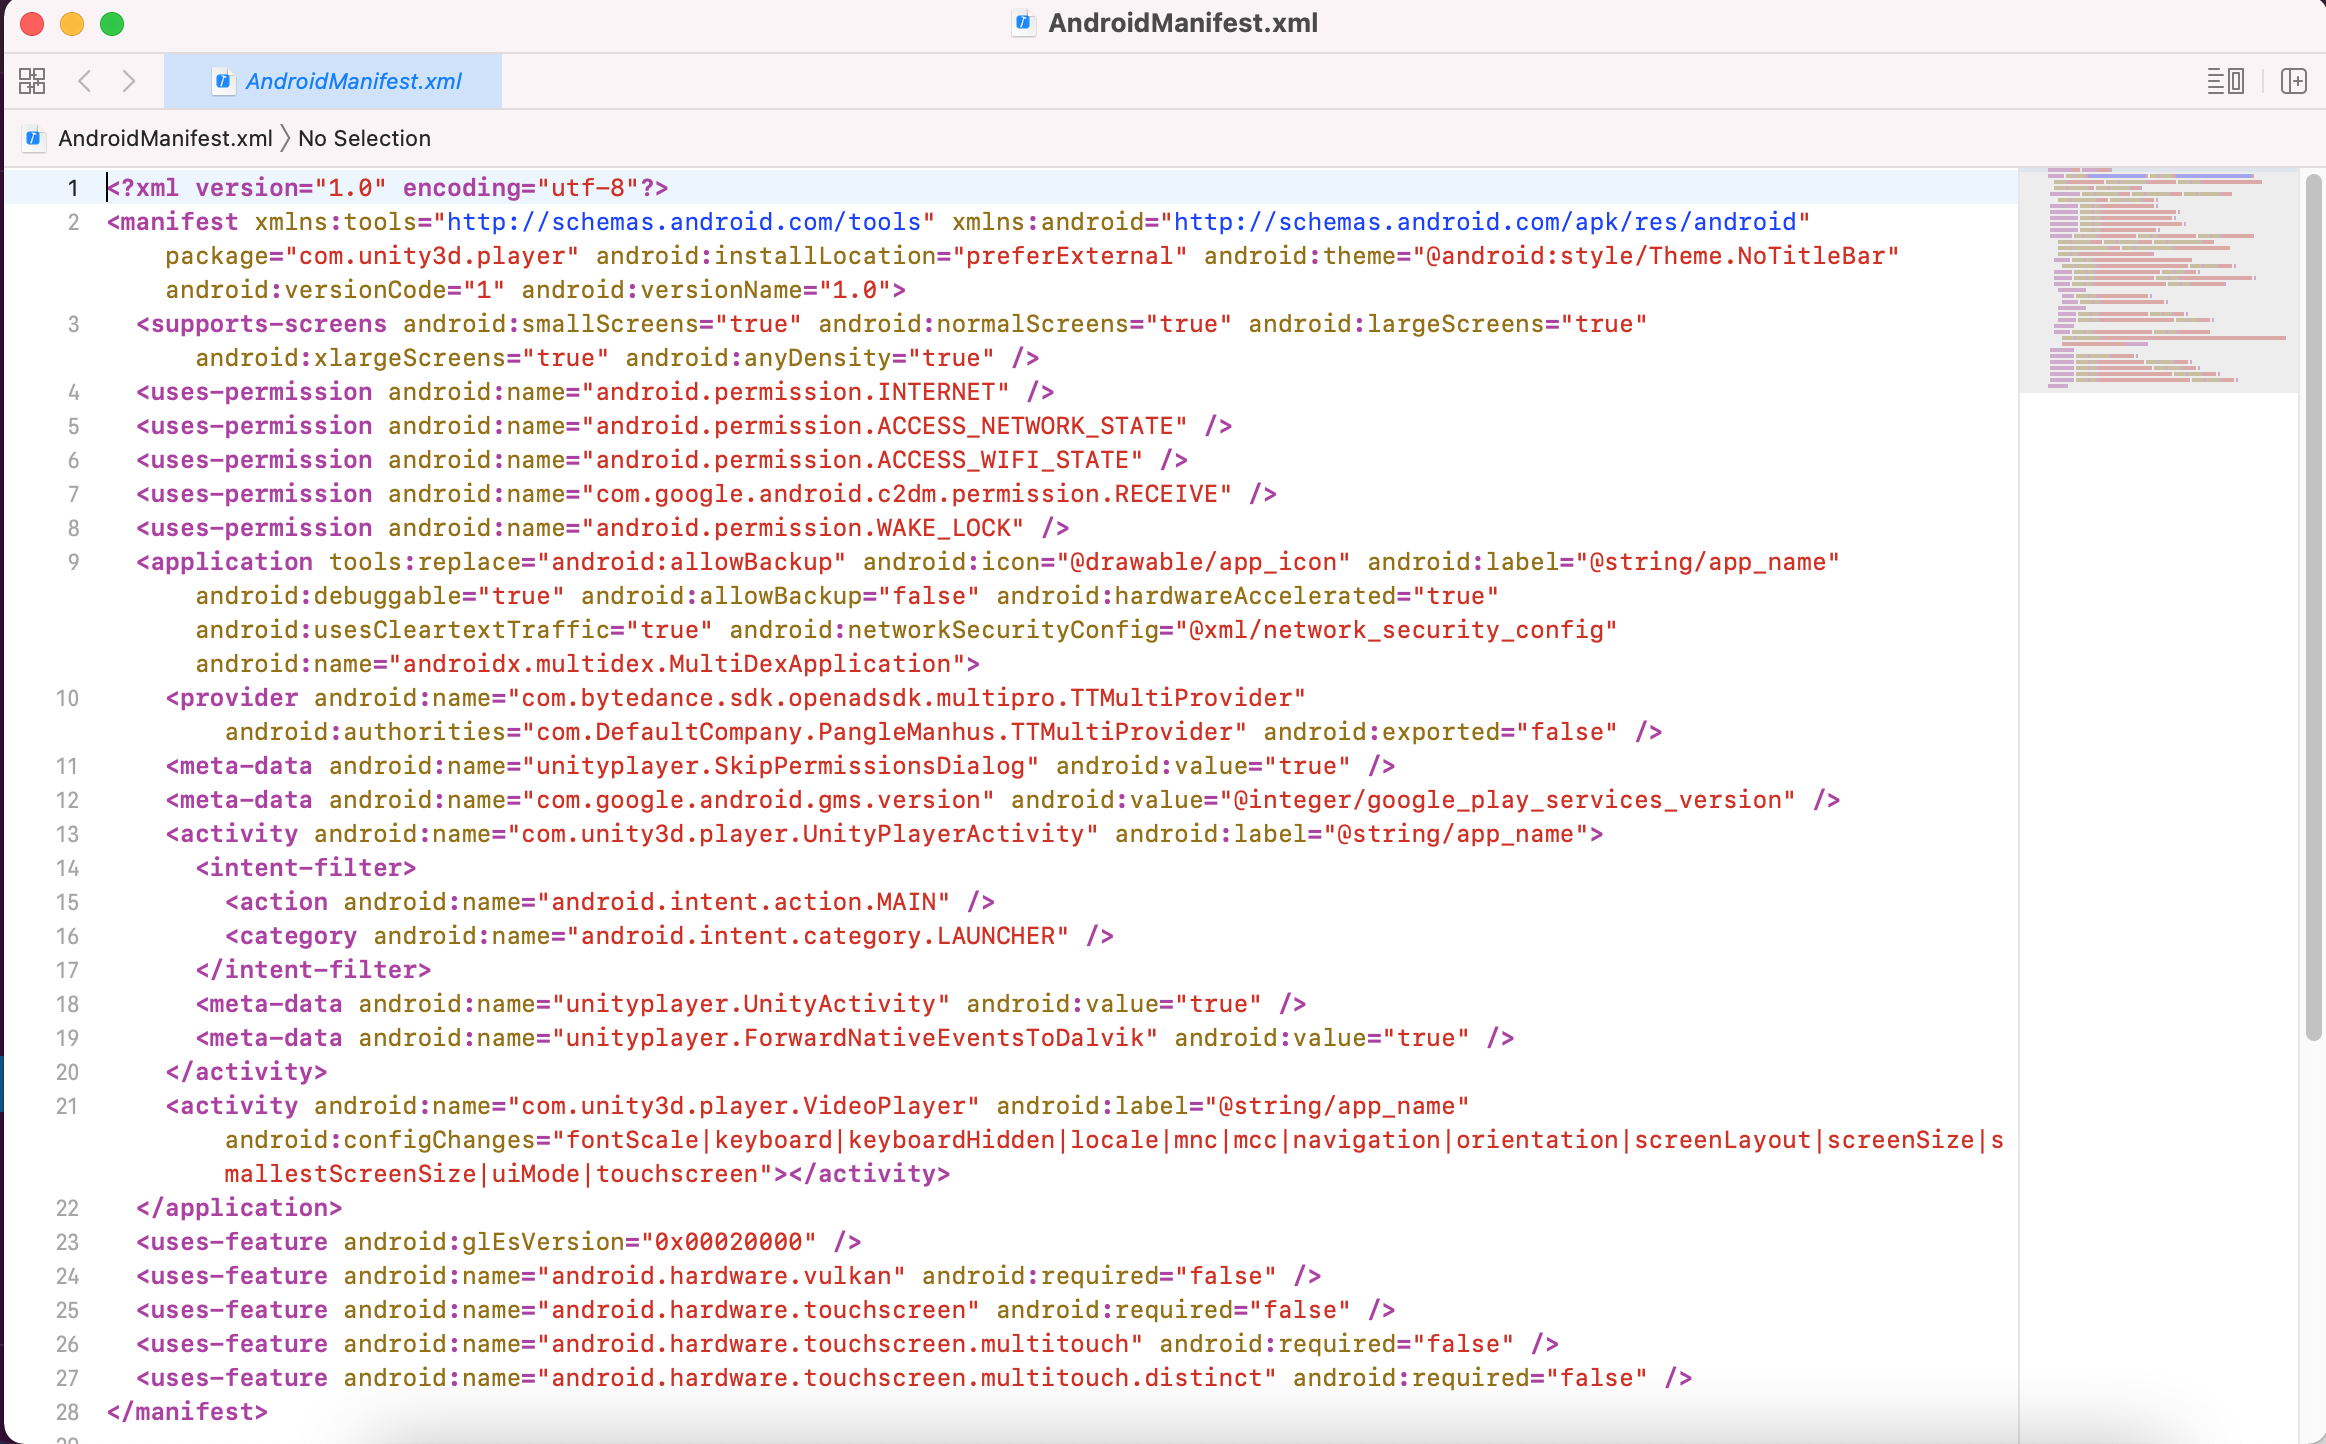
add following lines in AndroidManifest file
< uses-permission android:name="android.permission.WAKE_LOCK" />
Add following in application tag
 < provider

android:name="com.bytedance.sdk.openadsdk.multipro.TTMultiProvider"

android:authorities="${applicationId}.TTMultiProvider"  android:exported="false" />
For Pangle in Unity 2018 & 2019
For Pangle in Unity 2020
Enable progaurd and do the following settings:

For UnityAds (Android & iOS)
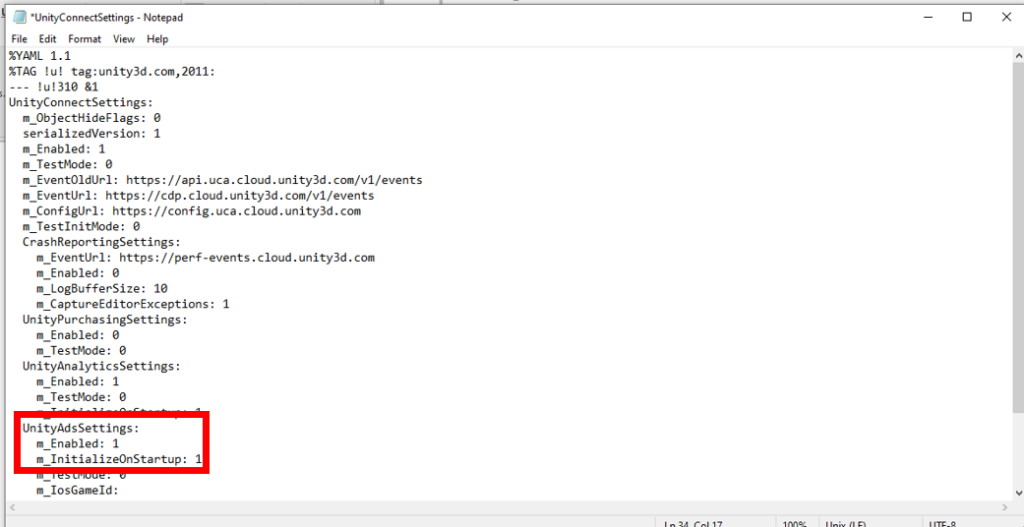
For Unity 2020 make sure UnityAds Settings is enabled.
- Open your project in File Explorer and go to the ProjectSettings folder.
- Open “UnityConnectSettings” file and for “UnityAdsSettings” set the value of m_Enabled to 1
Remove Ad Network
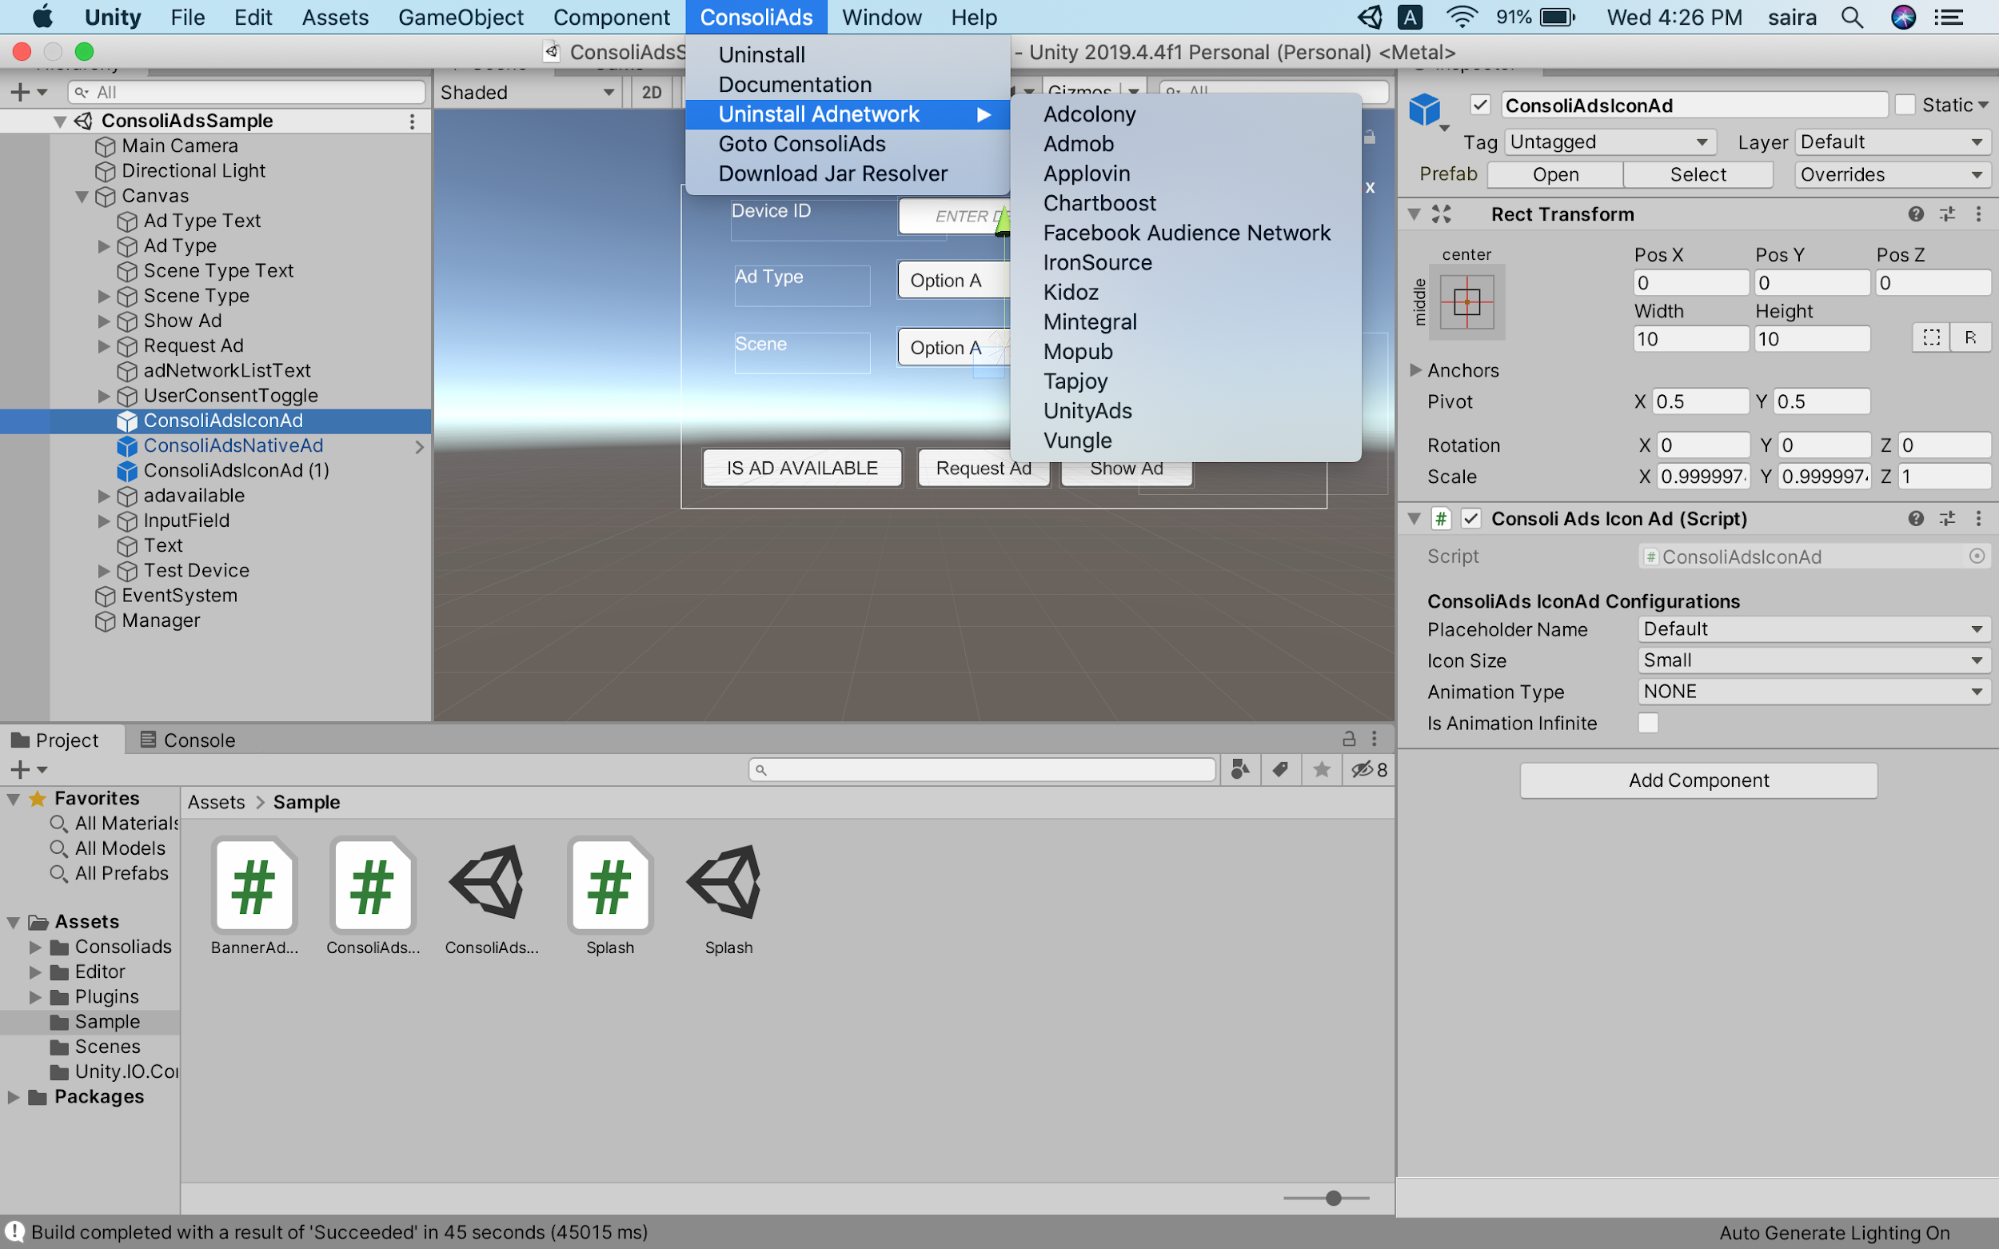
You can simply remove an ad network from your Unity project by using ConsoliAds menu in the Unity editor menu bar.
- Select ConsoliAds from the Unity editor menu bar
- From the uninstall ad network list, select the ad network that you want to remove from your project
Building for Android
Play Services Resolver
You need to download play services resolver for Android integration from the ConsoliAds menu in the Unity editor menu bar or from the following site.
https://github.com/googlesamples/unity-jar-resolver/releases
- Download the zip file of the latest version.
- Unzip the above downloaded zip file and find the unity package of play resolver.
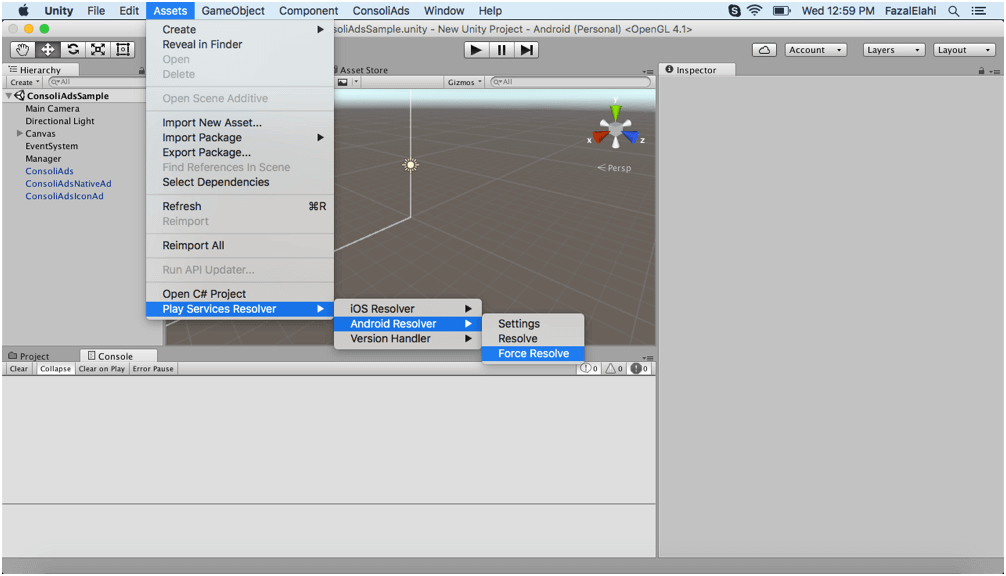
- Import it in your current project. It will automatically start downloading play services files. If it does not automatically start, then you need to resolve it yourself. Go to Menu-> Assets-> Play Services Resolver -> Force Resolve.
Resolver Settings
1). Go to Assets->Plugins->Android in unity project and delete the file named mainTemplate.gradle
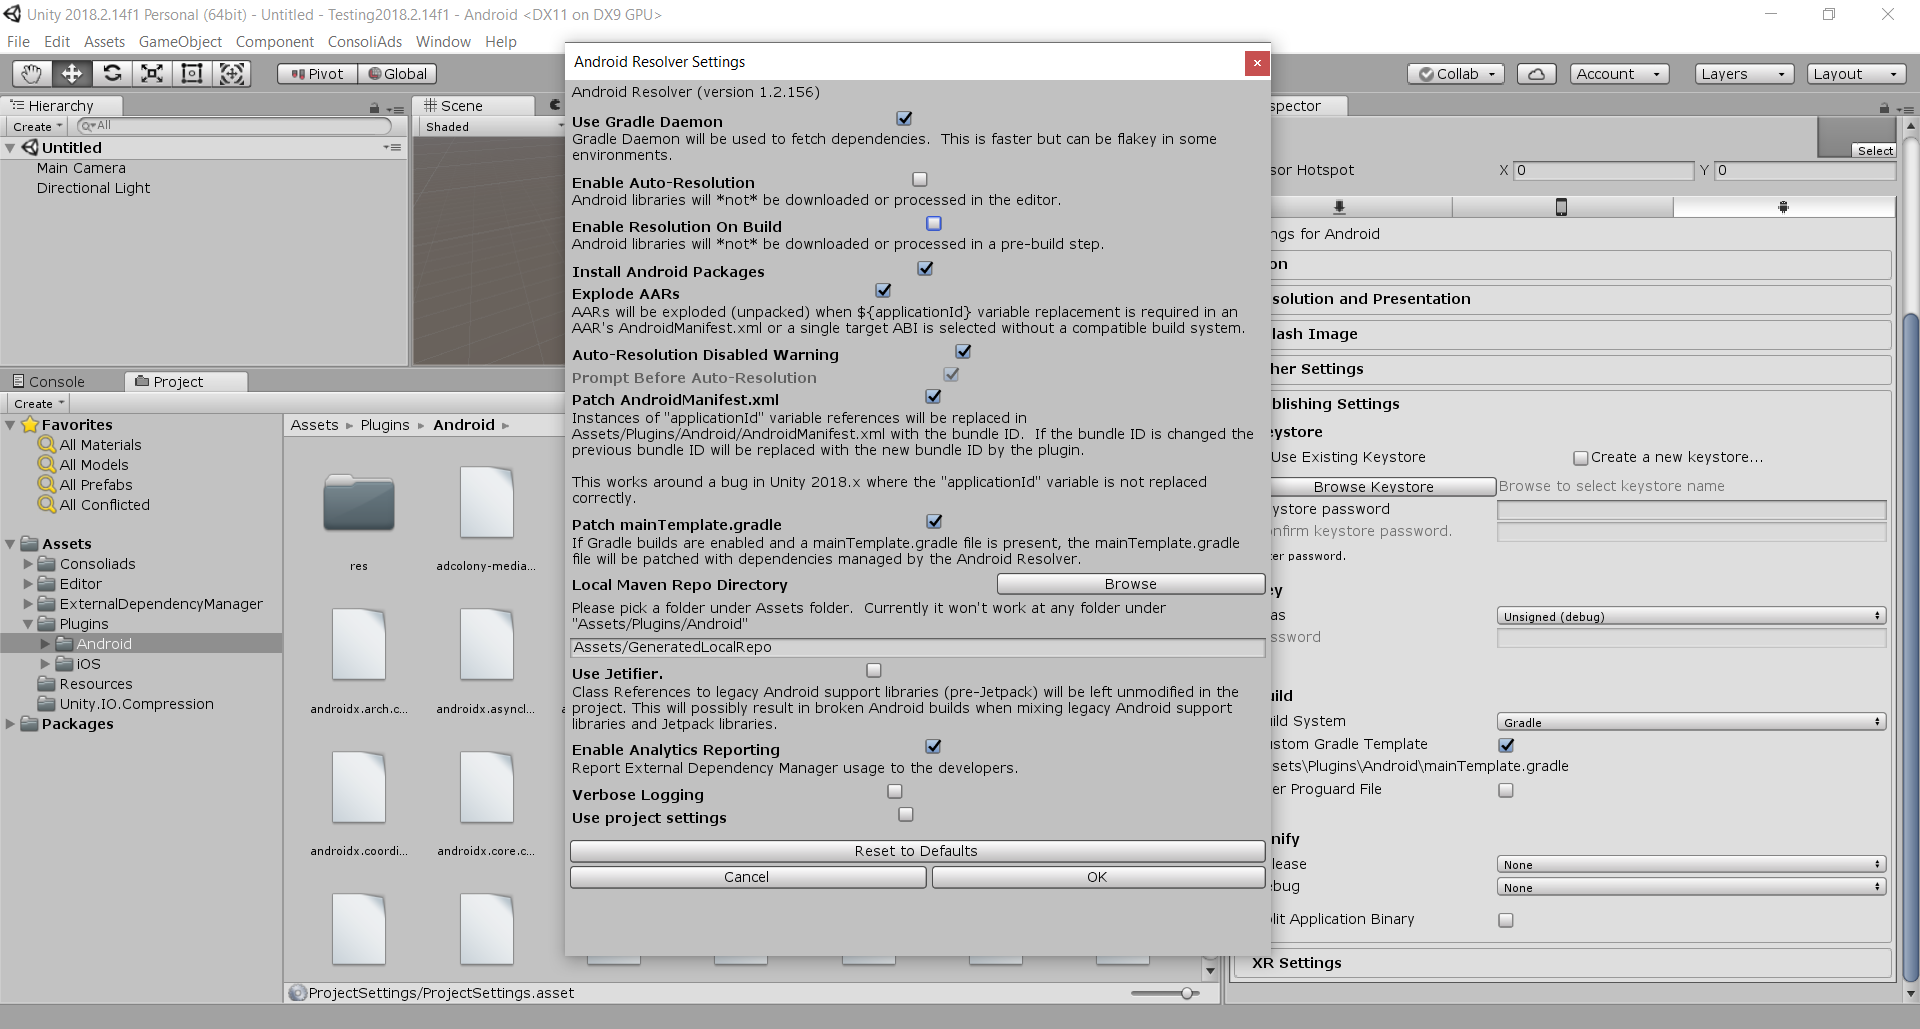
2). Go to Menu->Assets->External Dependency Manager -> Android Resolver -> Settings .
1). Apply Reset to Defaults in resolver setting dialog.
2). Required settings for play services resolver.
- Use Gradle Daemon should be checked
- Enable Auto-Resolution should be un-checked
- Enable Resolution On Build should be un-checked
AndroidX Support (Recommended)
To enable AndroidX support for your app:
- Go to your Play Service Resolver Android Settings and enable Jetifier.
- Your application will be required to have multi dex support when the Jetifier is enabled.
MultiDex Support
For Unity Editor 2018
- In your android build settings on Unity enable Custom Gradle Template
- Add the following attribute in the application tag of your Android Manifest
android:name="androidx.multidex.MultiDexApplication"
- In mainTemplate.gradle add the following in dependencies section
implementation 'androidx.multidex:multidex:2.0.1'
- In mainTemplate.gradle add in defaultConfig
multiDexEnabled true
For Unity Editor 2019 & above
- From Unity player setting enable the following
- Custom Main Manifest
- Custom Gradle Template
- Custom Launcher Gradle Template
- Custom Gradle Property Template
- Custom Base Gradle Template
- Add the following attribute in the application tag of your Android Manifest:
android:name="androidx.multidex.MultiDexApplication"
- In gradleTemplate.properties file add the following
android.useAndroidX=true
android.enableJetifier=true
- In the dependencies section of the launcherTemplate and mainTemplate file, add the following:
implementation 'androidx.multidex:multidex:2.0.1'
- In the defaultConfig section of the launcherTemplate and mainTemplate file, add the following:
multiDexEnabled true
- In the baseProjectTemplate file, change the classpath :
classpath 'com.android.tools.build:gradle:3.6.0'
** Congratulations, You are ready to build your app on to your android mobile device to see all the ad placements showing ads according to your Test Mode **
Building for iOS
- XCode version should be 12 or higher.
- Go to build settings-> player settings-> Other settings-> Target minimum iOS version set it to 9.0
- In your Xcode project, select your target Build Settings and make sure that you have added the following flag in “Other linker Flags”
- -ObjC
- In your Xcode project, select your target Build Settings and:
- Enable module option (c and objective-c)
- Enable Objective-C Exceptions
- In your Xcode project, select your target Build Phases, inside “Link Binaries With Libraries” drop down add these frameworks:
- Webkit.framework
- Add the following key/value pair in the plist:
- Key: gad_preferred_webview
- Value: wkwebview
- If you have made an Xcode build on a Windows PC, you may have to perform the following steps:
- Make sure that the following libraries and frameworks are linked to your project. if they are not automatically included, you need to manually add them.
- Libz.1.2.5.tbd
- Libz.tbd
- Libxml2.tbd
- Libobjc.tbd
- Libsqlite3.tbd
- AddressBook.framework
- AddressBookUI.framework
- SystemConfiguration.framework
- QuartzCore.framework
- MessageUI.framework
- MobileCoreServices.framework
- MediaPlayer.framework
- EventKitUI.framework
- EventKit.framework
- CoreData.framework
- CoreVideo.framework
- CoreMotion.framework
- CoreMedia.framework
- CoreTelephony.framework
- CoreText.framework
- CoreGraphics.framework
- AVFoundation.framework
- AVKit.framework
- AudioToolbox.framework
- AdSupport.framework
- Social.framework
- StoreKit.framework
- Webkit.framework
- Make sure that the following libraries and frameworks are linked to your project. if they are not automatically included, you need to manually add them.
Additional Steps for iOS 14
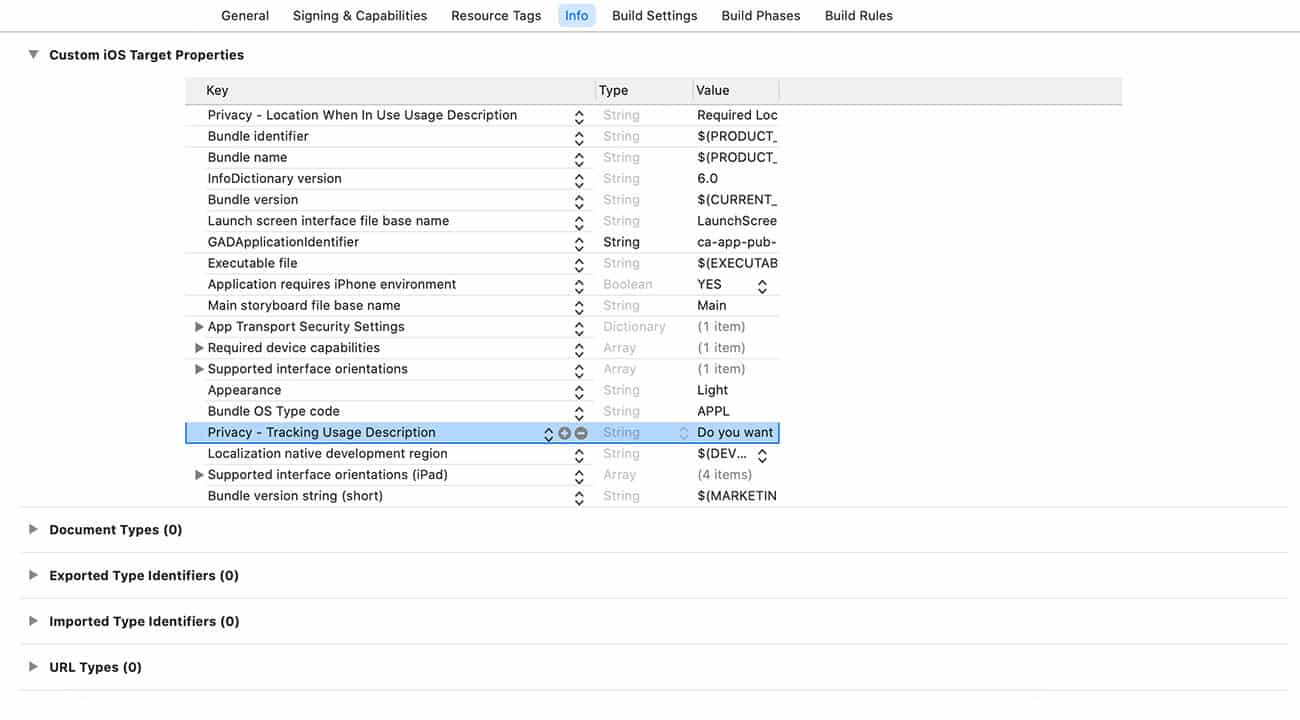
To display the App Tracking Transparency authorization request for accessing the IDFA, in your project settings goto Info and add a Key in “Custom iOS Target Properties” as:
- Name: Privacy – Tracking Usage Description
- Type: String
- Value: This identifier will be used to deliver personalized ads to you.
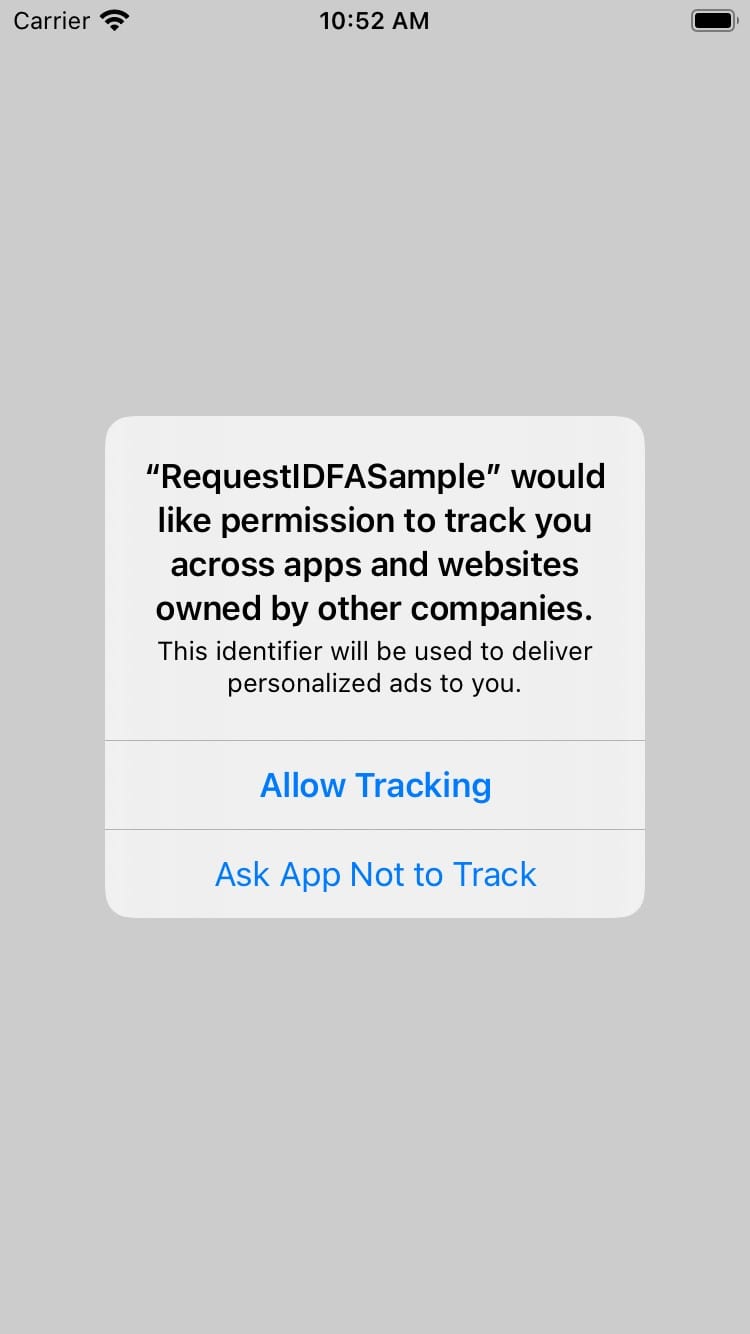
The usage description appears as part of the App Tracking Transparency dialog, as shown below:
Note: Before submitting your application to review on appStore, you need to make sure to add the following in your ‘App Privacy’ section.

SKAdNetwork Framework
The Following Ad Networks supports conversion tracking using Apple’s SKAdNetwork, which means they are able to attribute an app install even when IDFA is unavailable.
In your project settings goto Info and add a Key in “Custom iOS Target Properties” as:
- Name: SKAdNetworkItems
- Type: Array
Then add item for the array as follows:
- Name:
- Type: Dictionary
Having the following item Key:
- Name: SKAdNetworkIdentifier
- Type: String
- Value: < Ad Network ID from the table above >
An example of the added value can be seen as follows:

Please get the Ad Networks ids for your integrated Ad Network from the table
| Ad Networks | Adnetwork Id | Website |
| Admob | cstr6suwn9.skadnetwork | https://developers.google.com/admob/ios/ios14 |
| Adcolony | 4PFYVQ9L8R.skadnetwork | https://github.com/AdColony/AdColony-iOS-SDK/wiki/Project-Setup |
| IronSource | su67r6k2v3.skadnetwork | https://developers.ironsrc.com/ironsource-mobile/ios/ironsource-sdk7-update-guide/#step-1 |
| UnityAds | 4DZT52R2T5.skadnetwork | https://unityads.unity3d.com/help/ios/integration-guide-ios |
| Tapjoy | ecpz2srf59.skadnetwork | https://dev.tapjoy.com/ios-14/ |
| Chartboost | f38h382jlk.skadnetwork | https://answers.chartboost.com/en-us/child_article/ios |
| Vungle | GTA9LK7P23.skadnetwork | https://support.vungle.com/hc/en-us/articles/360002925791#add-skadnetwork-ids-to-info-plist-0-10 |
| Mintegral | KBD757YWX3.skadnetwork | http://cdn-adn.rayjump.com/cdn-adn/v2/markdown_v2/index.html?file=sdk-m_sdk-ios&lang=en |
| v9wttpbfk9.skadnetwork
n38lu8286q.skadnetwork |
https://developers.facebook.com/docs/audience-network/guides/SKAdNetwork | |
| Mopub | 7953jerfzd.skadnetwork | https://developers.mopub.com/publishers/ios/integrate/ |
| InMobi | wzmmz9fp6w.skadnetwork | https://support.inmobi.com/monetize/ios-guidelines/preparing-for-ios-14 |
| Applovin | ludvb6z3bs.skadnetwork | https://dash.applovin.com/docs/integration#iosIntegration |
| StartApp | 5l3tpt7t6e.skadnetwork | https://support.start.io/hc/en-us/articles/360017903540-iOS-14-Readiness- |
| Kidoz | v79kvwwj4g.skadnetwork | https://github.com/Kidoz-SDK/KIDOZ_iOS_SDK_New_Example |
Few Exceptions
- If you are using Admob please make sure to add this key in info plist GADApplicationIdentifier and set its value to your admob AppID
- If you are using Facebook and Mopub please embed the frameworks as following
- Embed the MoPub.xcframework by selecting target”unity-iphone” -> build phases ->Embed Framework
- For Unity 2019
- Embed the MoPub.xcframework by selecting target”unity-iphone” -> build phases ->Embed Framework
** Congratulations, You are ready to build your app on to your iOS mobile device to see all the ad placements showing ads according to your Test Mode **
Building for Huawie
**For Huawei AppGallery, ConsoliAds Mediation works best with ConsoliAds Ad Network and Huawei Ads**
SHA-256 Certificate Fingerprint Generation:
- Use the KEYSTORE of your game.
- Open your terminal.
- Run this command:
keytool -list -v -keystore "path" -alias aliasname -storepass password -keypass password
- Replace path with your keystore path
- Replace aliasname with your keystore alias name
- Replace password with your keystore password
- Replace path with your keystore path
- Replace aliasname with your keystore alias name
- Replace password with your keystore password
Like this:
keytool -list -v -keystore “/Volumes/Data Disk/keystore/HuaweiKeystore.keystore” -alias huaweikeystore -storepass 123456 -keypass 123456
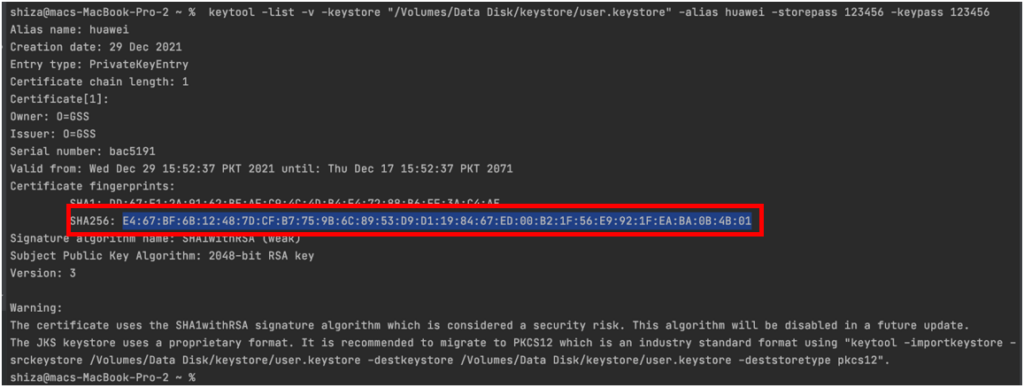 Copy your SHA-256 certificate fingerprint.
Upload Certificate Generation:
- Use the KEYSTORE of your game.
- Open your terminal.
- Run this command:
keytool -exportcert -keystore "path" -alias aliasname -file "certificate path"
- Replace path with your keystore path
- Replace aliasname with your keystore alias name
- Replace certificate path with your path where you want to save a certificate file
Like this:
keytool -list -v -keystore “/Volumes/Data Disk/keystore/HuaweiKeystore.keystore” -alias huaweikeystore -storepass 123456 -keypass 123456
- Certificate will be created.
Adding Certificate and fingerprint key on Huawei portal
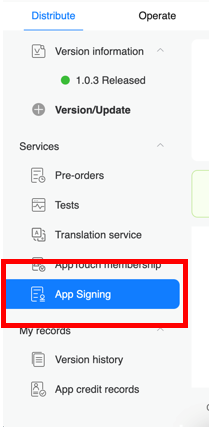
- Under Distribute tab goto Services->App Signing
- Select the option “Let AppGallery Connect create and manage app signature for you” and upload the Certificate you just created.
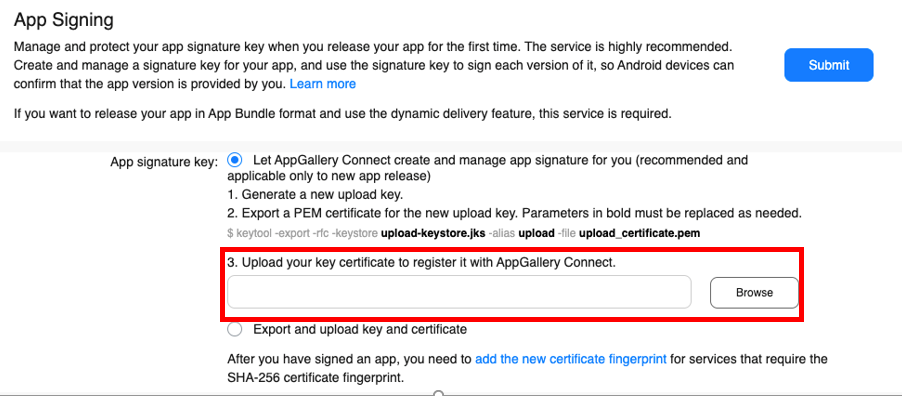
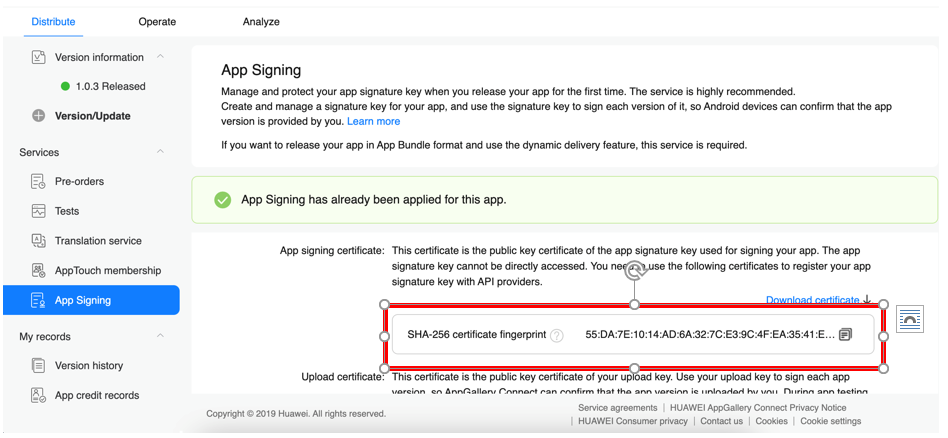
- Once certificate is uploaded add your fingerprint in the text box as shown below
 App Settings on ConsoliAds Dashboard
After successfully integrating your app with ConsoliAds plugin, following app settings can be explored on the ConsoliAds dashboard in the App Details section:
Test Mode
By Default a new application is in Test Mode. In Test Mode only test ads are shown. Test Mode can ONLY be disabled by importing your app in the Details tab.
Ad Network IDs
If you are using Admob, Facebook Audience Network or Chartboost you need to provide their Ad IDs on the dashboard in your app Ad Networks section.
All other integrated ad networks will automatically go Live once your app’s Test Mode is disabled.
Ad Filters
Apply all ad filters, for the integrated ad networks, with complete ease from the ConsoliAds dashboard in the Ad Filters section of the app details.
Debug Logs
If enabled, debug logs will be shown for your app in respective editors for Android and iOS.
Child Directed
Child Directed enables your application with complete COPPA compliance.
Hide Ads
All ads, except Rewarded Videos, can be completely turned OFF using Hide Ads on the dashboard.
Auto Mediation
Auto Mediation automatically optimizes your ad networks for each region and each ad format pertaining to every placeholder in your app such that you get the best eCPMs.
We highly recommend to use Auto Mediation in order to witness instant revenue increments upto 20%
For Advance Development
More ConsoliAdsBannerView() definitions
ConsoliAdsBannerView object which can also be initialized according to the following function definitions:
- Using custom size
AdSize size = new AdSize (300,250);

ConsoliAdsBannerView consoliAdsBannerView = new ConsoliAdsBannerView( size );
- Using a custom position
AdPosition position = new AdPosition (100 , 200);

ConsoliAdsBannerView consoliAdsBannerView = new ConsoliAdsBannerView( position  );
- Using a custom size and position
AdSize size = new AdSize (300,250);

AdPosition position = new AdPosition (100 , 200);

ConsoliAdsBannerView consoliAdsBannerView = new ConsoliAdsBannerView( size  , position  );
Show/Hide Native Ad programmatically
- In order to manually manipulate the native ad, remove the script attached with the ‘ConsoliAdsNative’ prefab.
- Create a game object variable in your script.
- Attach variable with the prefab that you have attached in your scene.
Show Native Ad Using ConsoliAds:
ConsoliAds.Instance.ShowNativeAd(GameObject nativeGameObject, PlaceholderName placeholderName);
Hide Native Ad Using ConsoliAds:
ConsoliAds.Instance.HideNative();
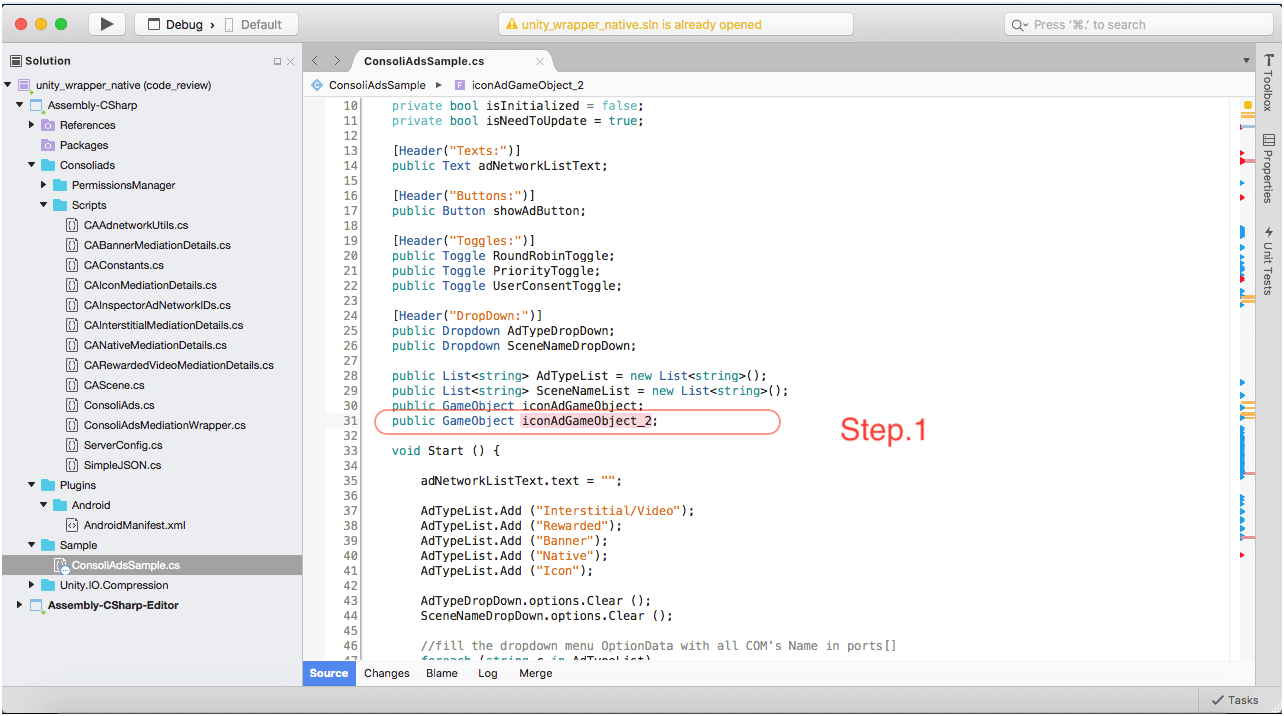
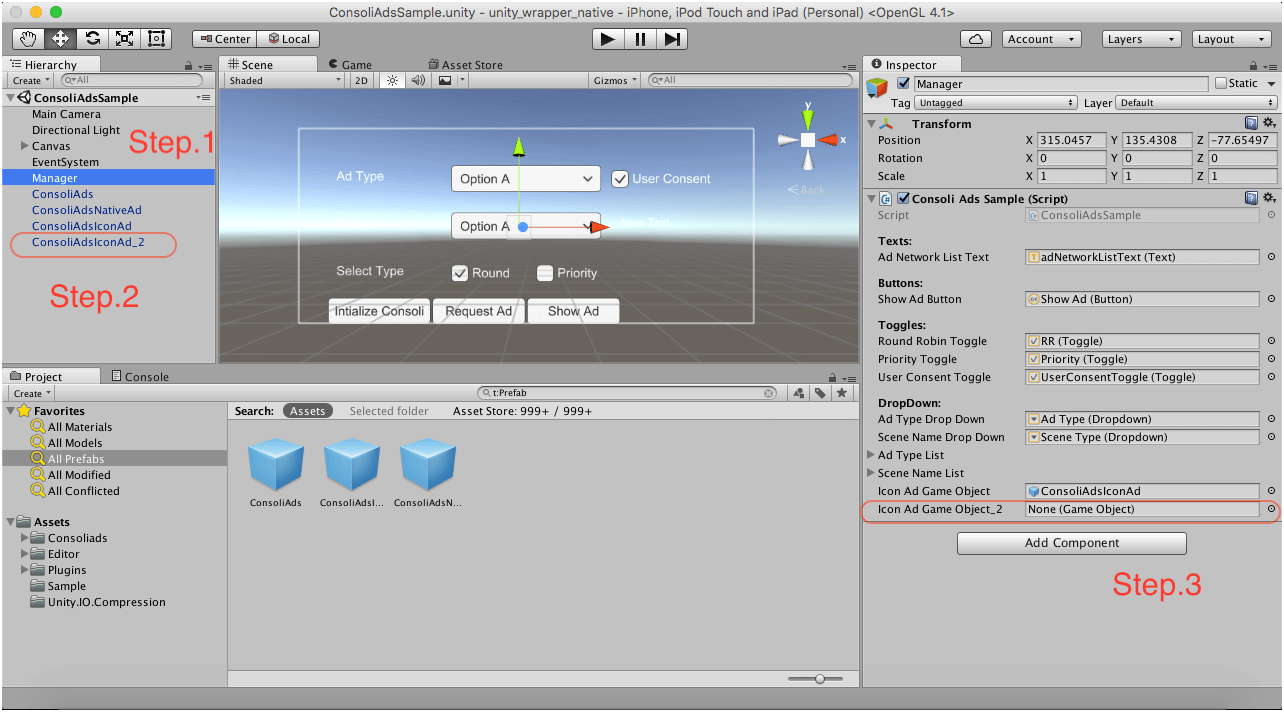
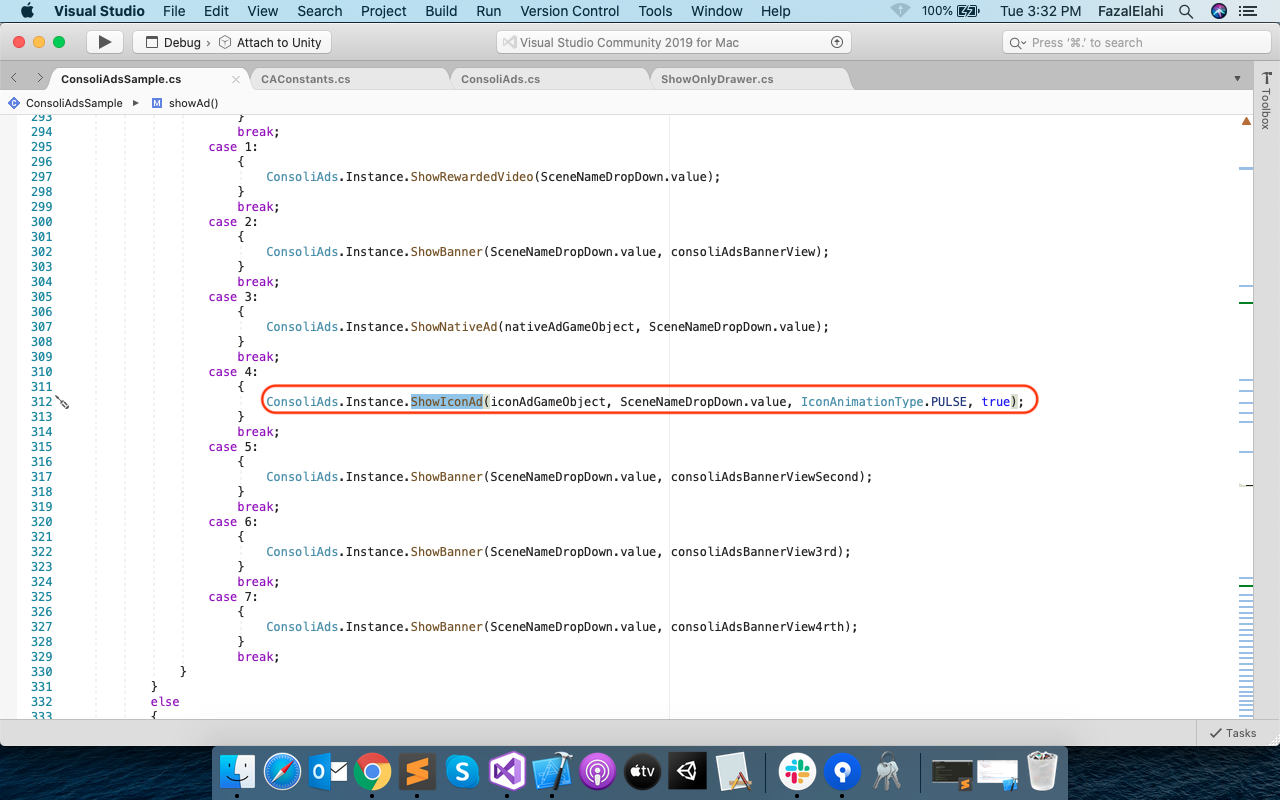
Show Multiple Icon Ads Programmatically
- Create a variable of type GameObject.
- Use this game object as parameter to call:
ConsoliAds.Instance.ShowIconAd(GameObject iconAdGameObject , IconAnimationType.PULSE , bool isAnimationInfinite , PlaceholderName placeholderName);
Hide Multiple Icon Ads Programmatically
- Use the same game object as parameter to call:
ConsoliAds.Instance.DestoryIconAd (GameObject iconAdGameObject_2);
Implementing Callback Events
ConsoliAds implements single callback events for all Ad Networks. The following callbacks can be used as per need:
public static event Action< bool > onConsoliAdsInitializationSuccess;
Interstitial Callbacks:
public static event Action< PlaceholderName > onInterstitialAdShownEvent;
public static event Action< PlaceholderName > onInterstitialAdFailedToShowEvent;
public static event Action< PlaceholderName >  onInterstitialAdClosedEvent;
public static event Action< string > onInterstitialAdClickedEvent;
public static event Action< PlaceholderName >  onInterstitialAdLoaded;
public static event Action< PlaceholderName >  onInterstitialAdFailToLoad;
Rewarded Video Callbacks:
public static event Action< PlaceholderName >  onRewardedVideoAdLoadedEvent;
public static event Action< PlaceholderName >  onRewardedVideoAdFailToLoadEvent;
public static event Action< PlaceholderName >  onRewardedVideoAdShownEvent;
public static event Action< PlaceholderName >  onRewardedVideoAdFailToShowEvent;
public static event Action< PlaceholderName >  onRewardedVideoAdCompletedEvent;
public static event Action< PlaceholderName >  onRewardedVideoAdClosedEvent;
public static event Action< string  > onRewardedVideoAdClickEvent;
Rewarded Interstitial Callbacks:
public static event Action< PlaceholderName > onRewardedInterstitialAdLoadedEvent;
public static event Action< PlaceholderName > onRewardedInterstitialAdFailToLoadEvent;
public static event Action< PlaceholderName > onRewardedInterstitialAdShownEvent;
public static event Action< PlaceholderName > onRewardedInterstitialAdCompletedEvent;
public static event Action< PlaceholderName > onRewardedInterstitialAdClosedEvent;
Banner Callbacks:
public static event Action onBannerAdShownEvent;
public static event Action onBannerAdFailToShowEvent;
public static event Action< string > onBannerAdClickEvent;
public static event Action onBannerAdRefreshEvent;
Icon Callbacks:
public static event Action onIconAdShownEvent;
public static event Action onIconAdFailedToShowEvent; Static Interstitial Ad
public static event Action onIconAdCloseEvent;
public static event Action onIconAdClickEvent;
public static event Action onIconAdRefreshEvent;
Native Callbacks:
public static event Action onNativeAdShownEvent;
public static event Action onNativeAdFailedToShownEvent;
public static event Action onNativeAdClickEvent;
More Help Sources of Integration
ConsoliAds Sample Project:
You can download the sample project from https://portal.consoliads.com/download/unity to see complete ConsoliAds integration already implemented for all ad formats.
Youtube Videos:
You can watch short integrations videos on our youtube channel, https://www.youtube.com/watch?v=nExp4zfb0xc, to further explore integrations with ConsoliAds.
ConsoliAds GitHub forum
If you are having any technical issues, you can visit https://github.com/teamconsoliads/sampleapp-unity to view known issues, share problems and suggestions.